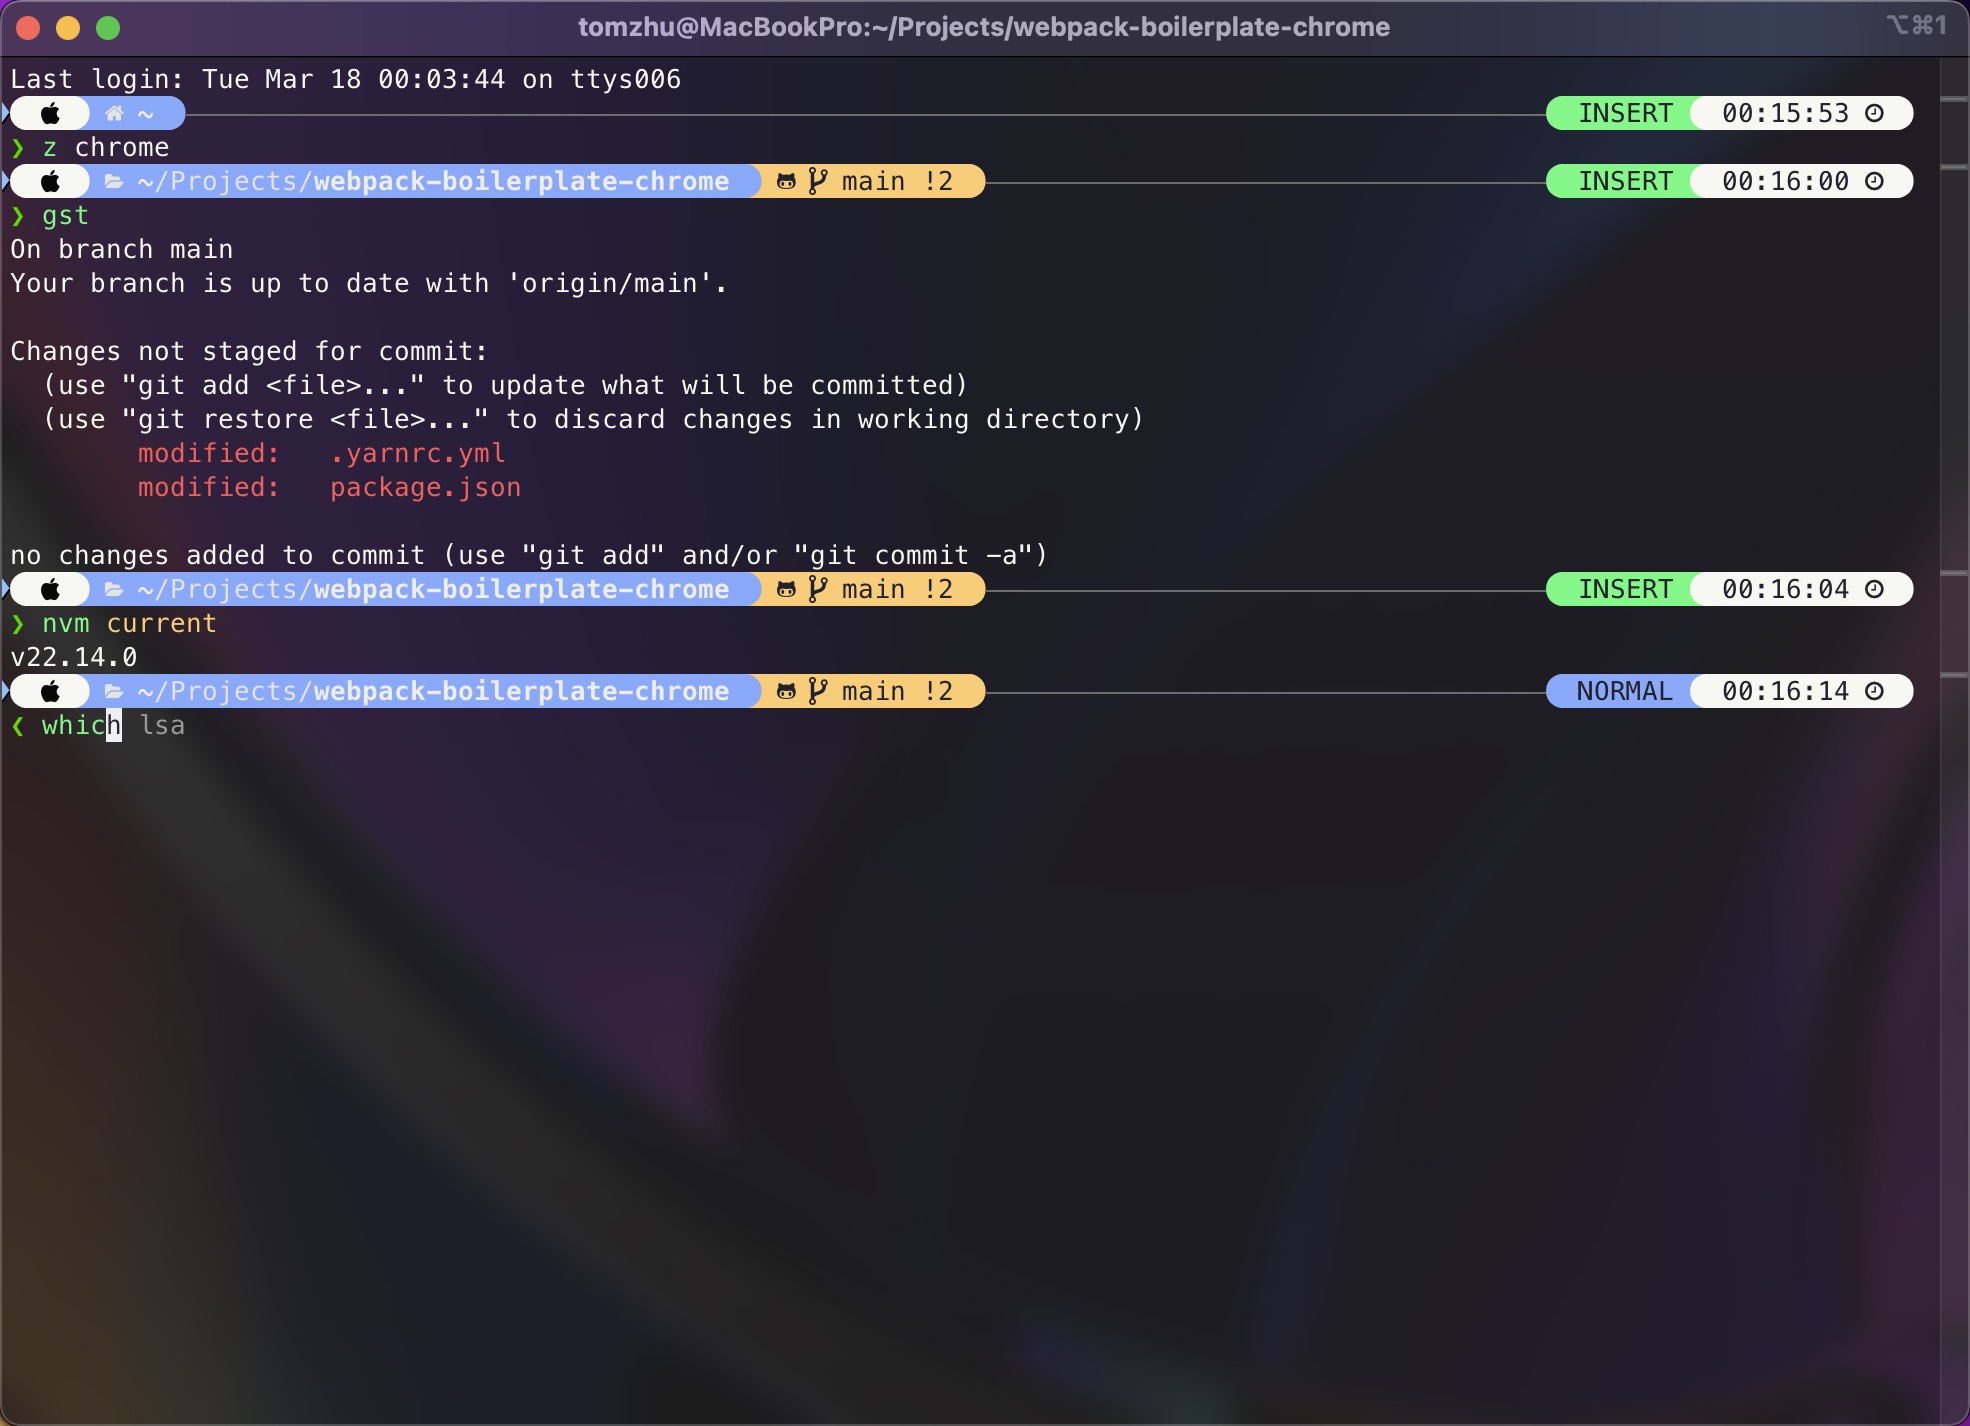
终端是开发时必不可少的工具,但 macOS 自带的终端外观和功能都平平无奇。本文将介绍如何利用 iTerm2、On My Zsh、Powerlevel10k 等工具打造一个好看又实用的 macOS 终端。在开始之前,先展示一下最终效果。
在开始前,建议备份当前的配置文件。
1
2
cp ~/.zshrc ~/.zshrc.bak
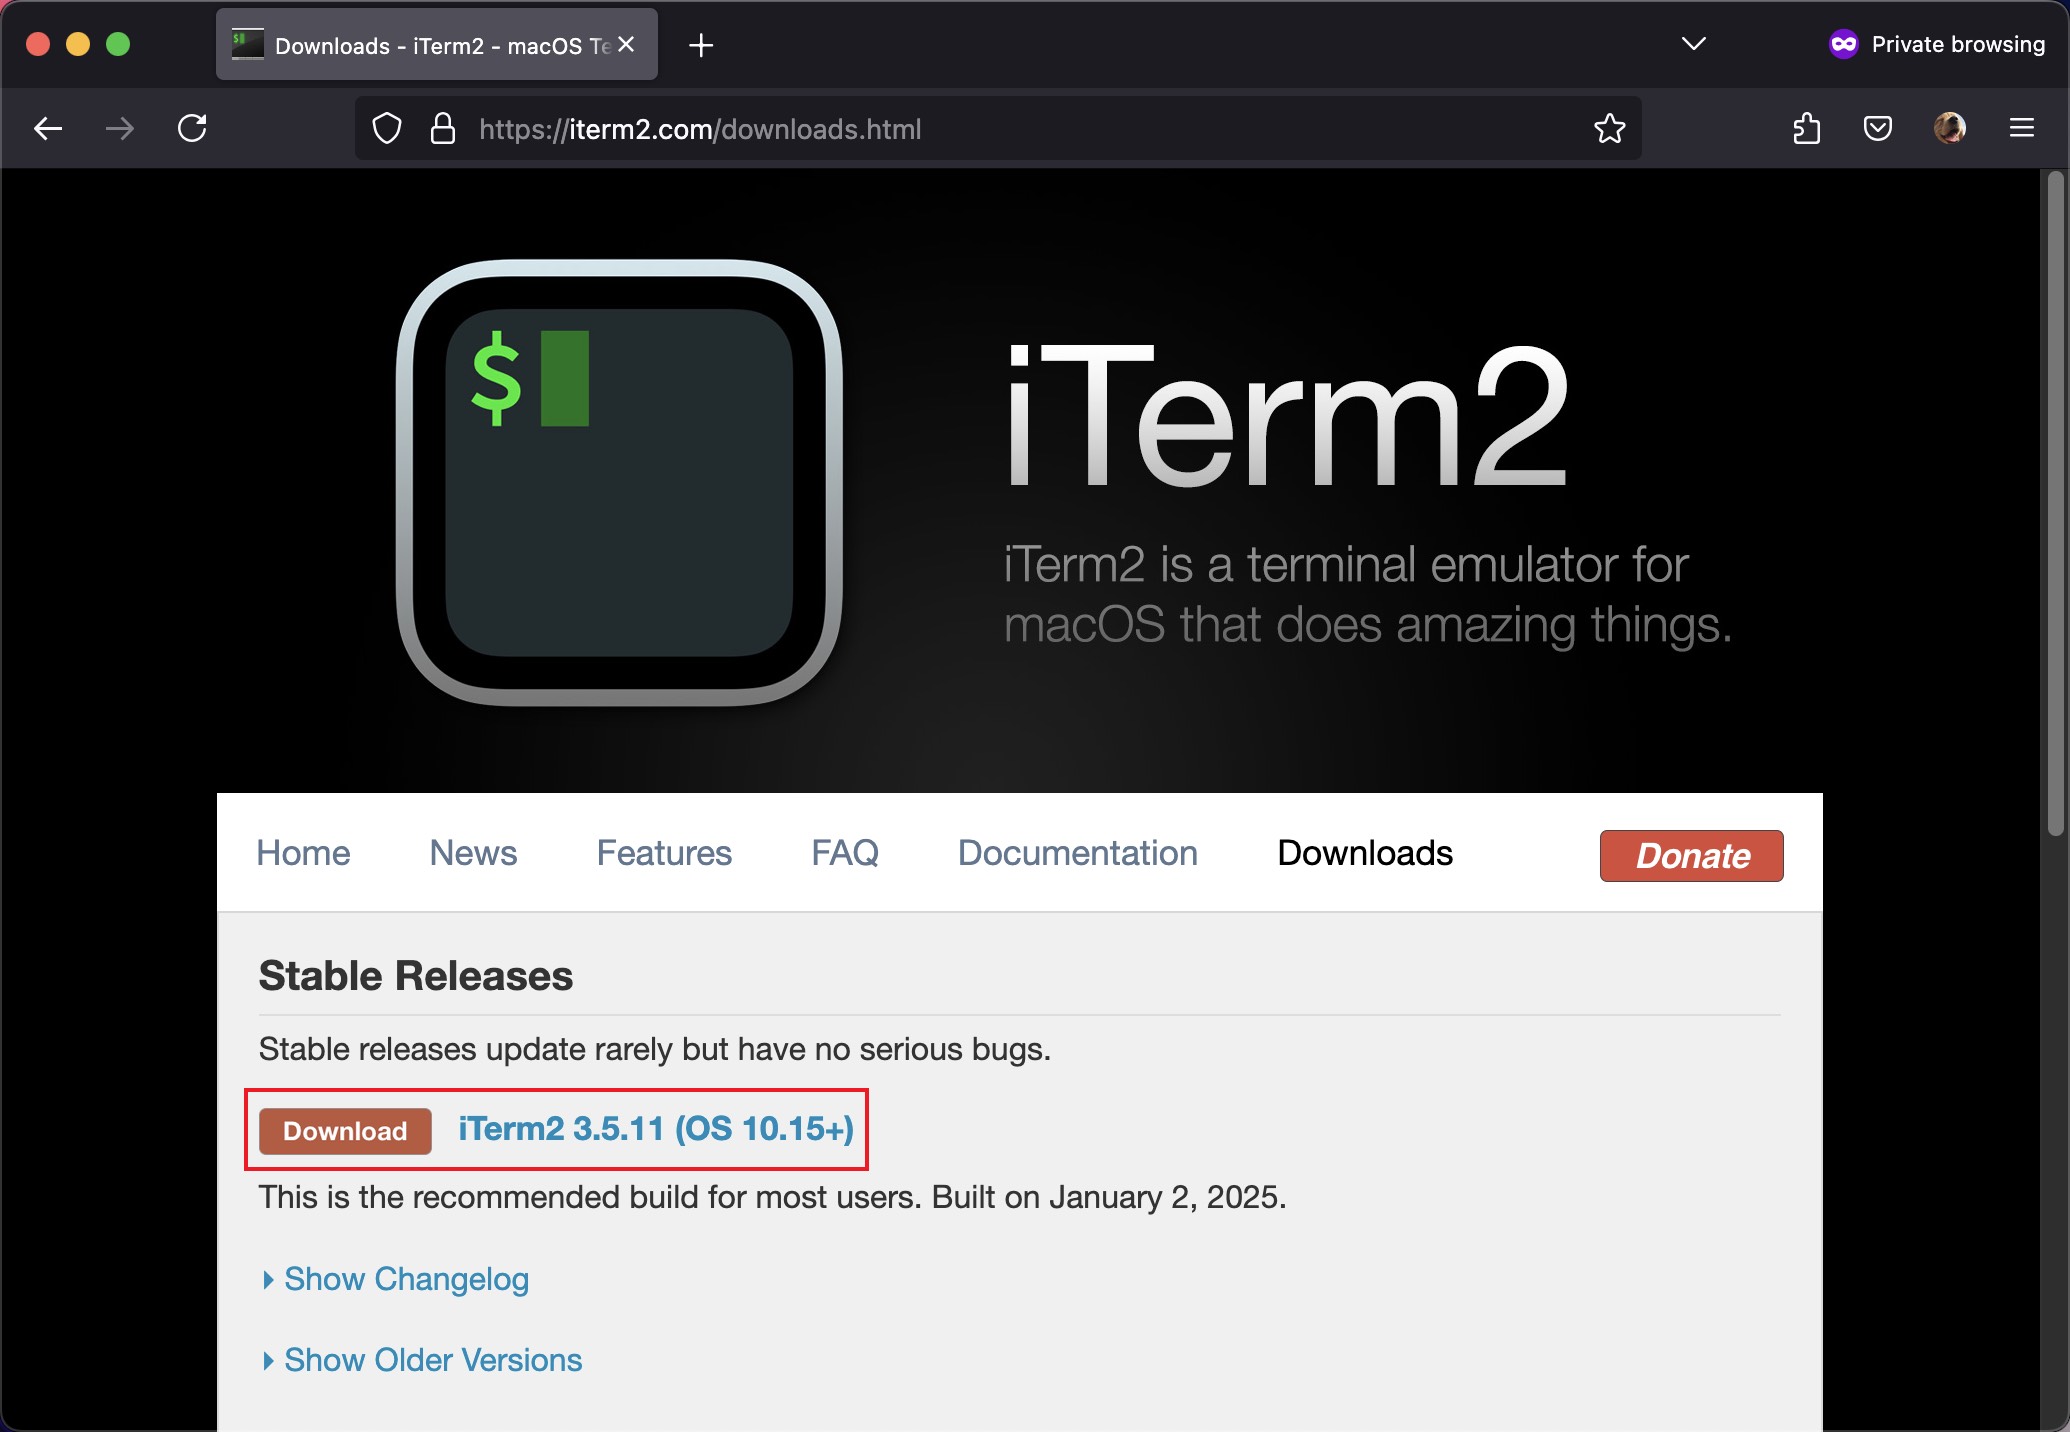
iTerm2 iTerm2 是 macOS 的终端的替代品,有着更多的功能。首先,我们需要前往 https://iterm2.com/downloads.html 下载最新版本。
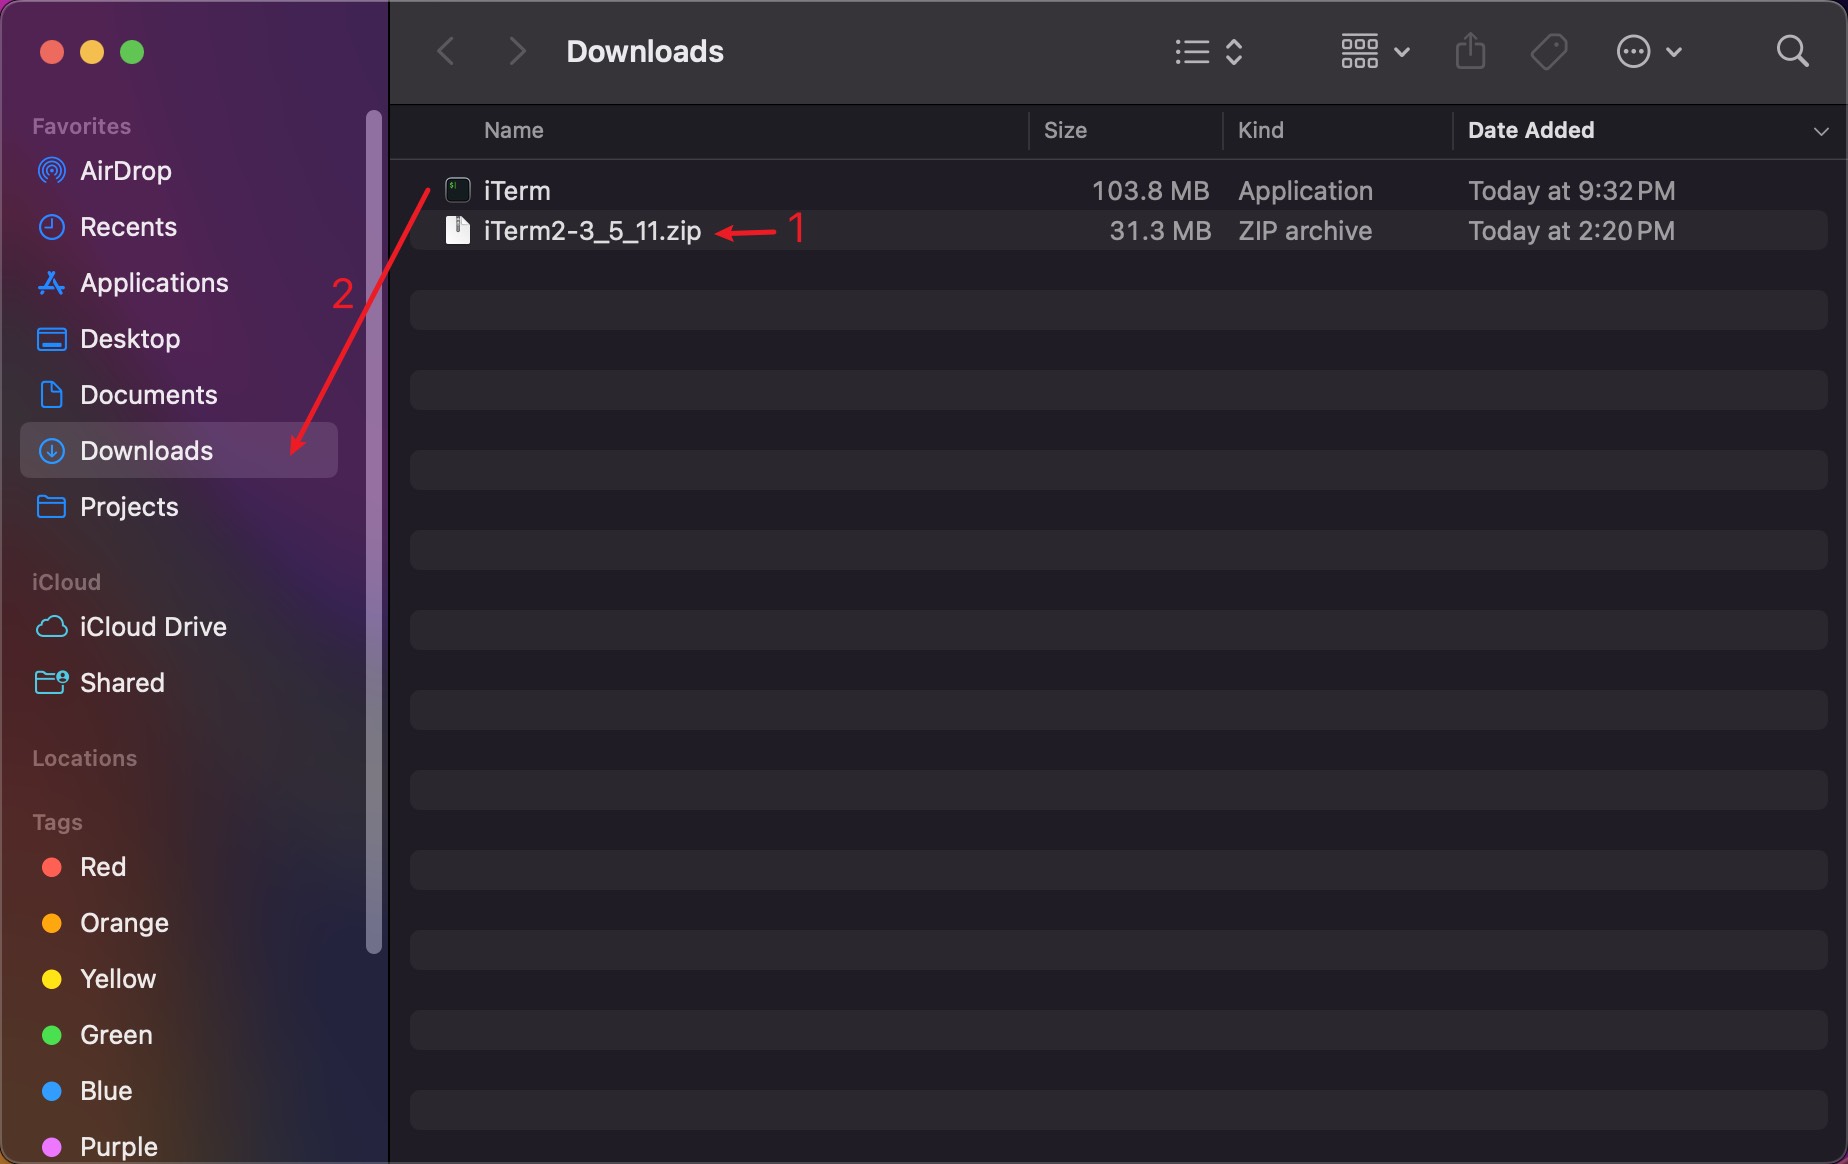
接着,解压下载的 zip 文件,并将得到的 iTerm 文件拖到“应用程序”文件夹中。
打开 iTerm2,在菜单栏中依次点击 iTerm2 -> Settings... 进入设置页面。
首先,进入 General -> Selection 选项卡,修改下图中标注的设置。
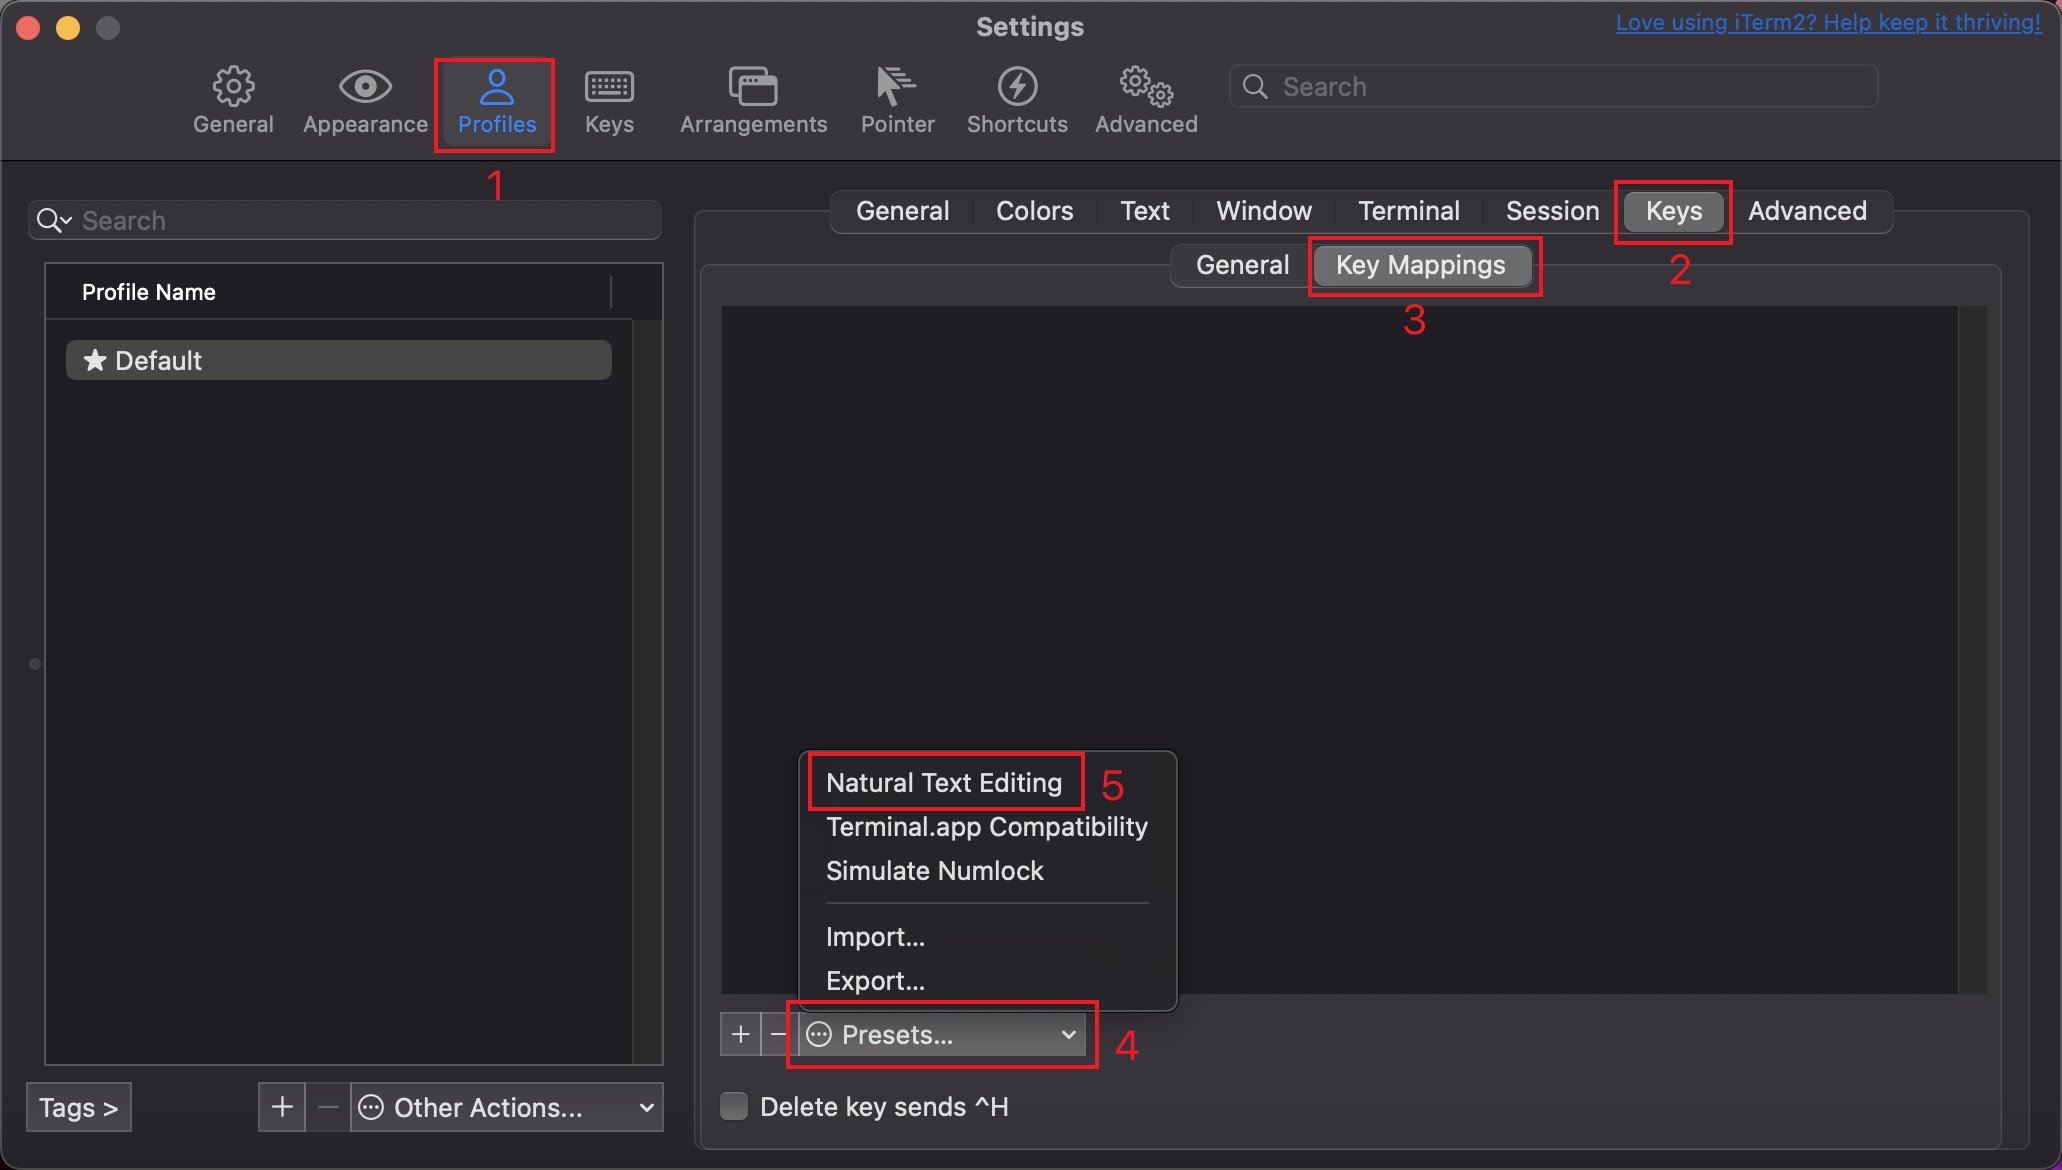
接着,进入 Profiles -> Keys -> Key Mappings 选项卡,点击 Presets... -> Natural Text Editing。
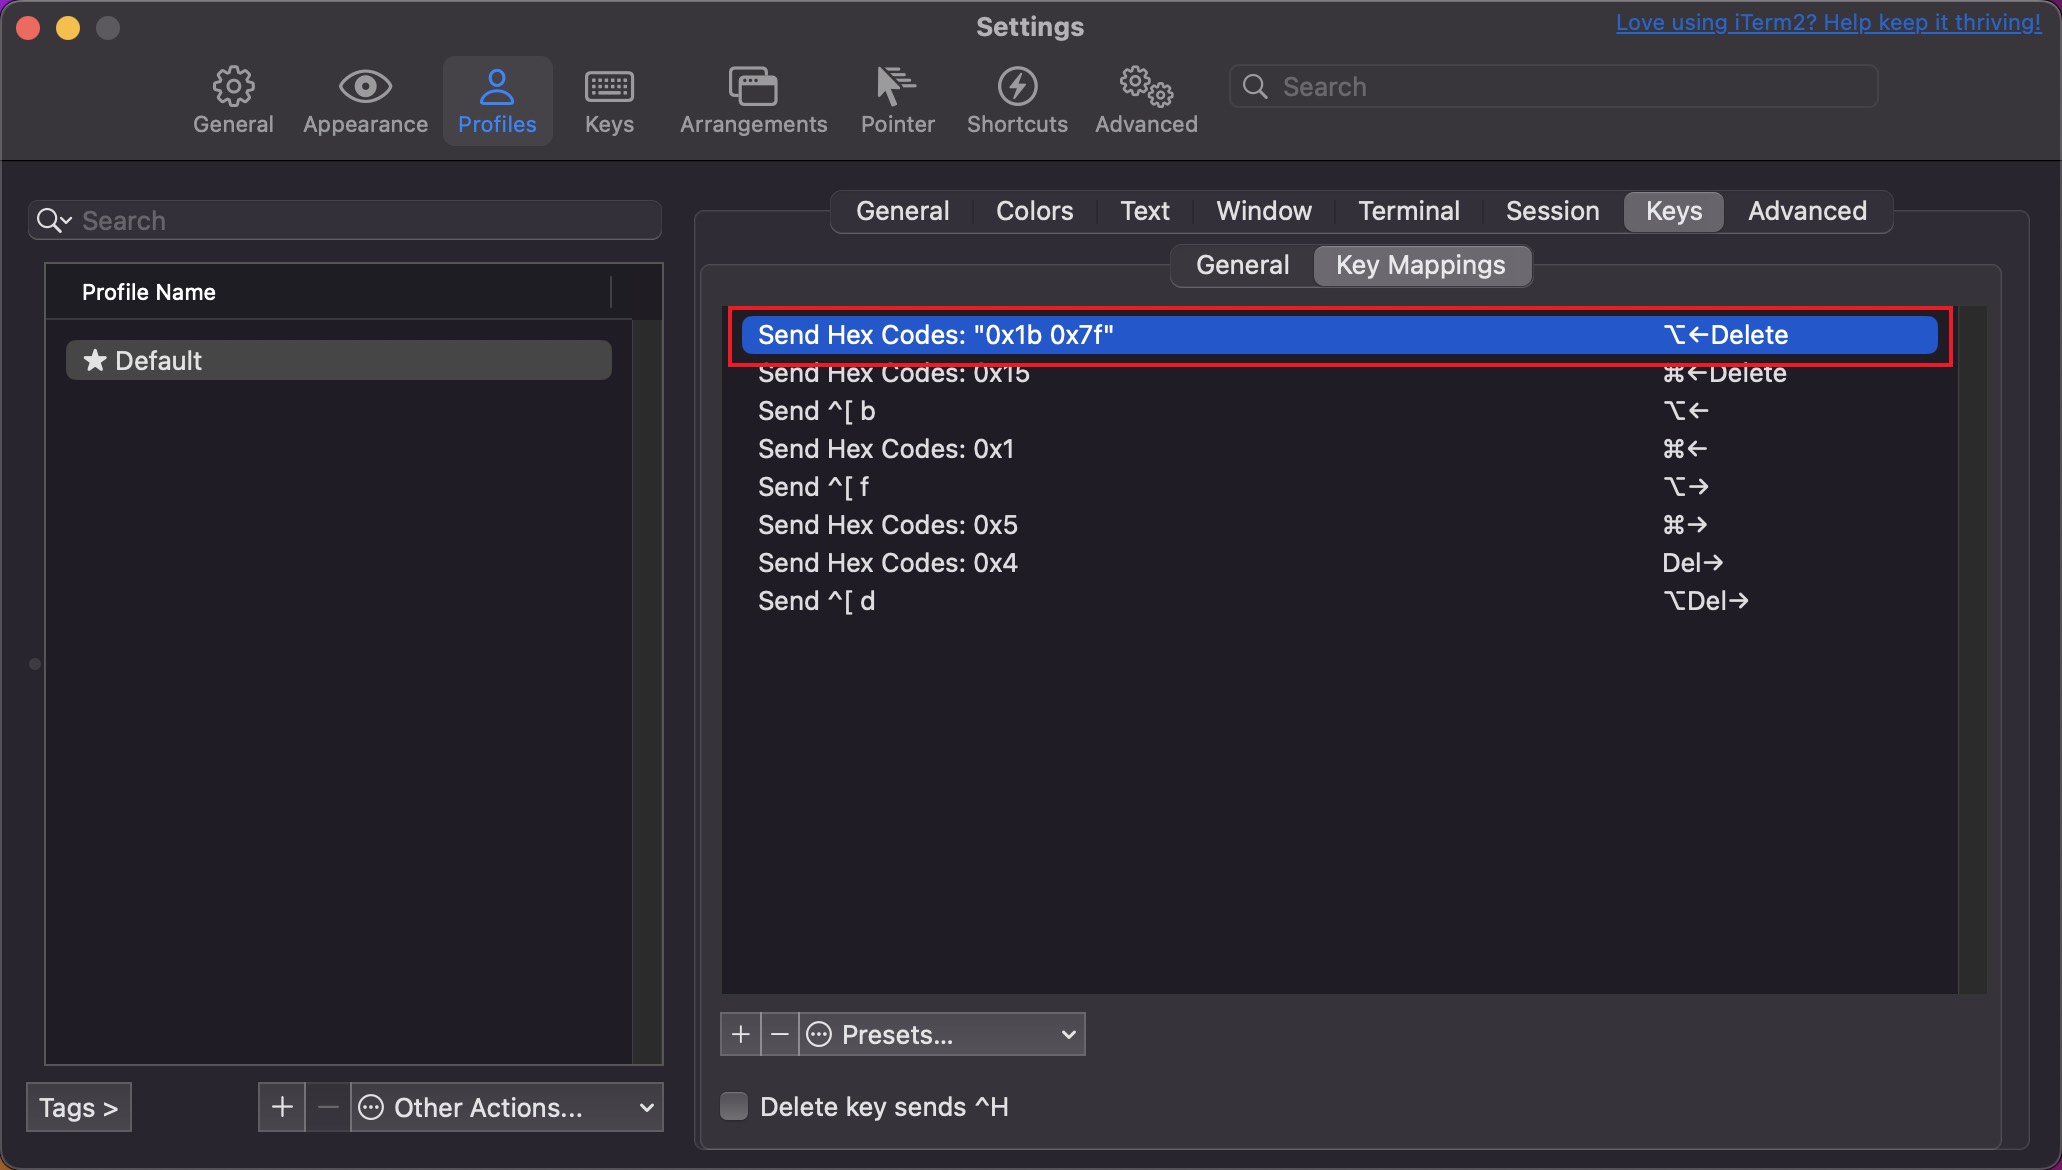
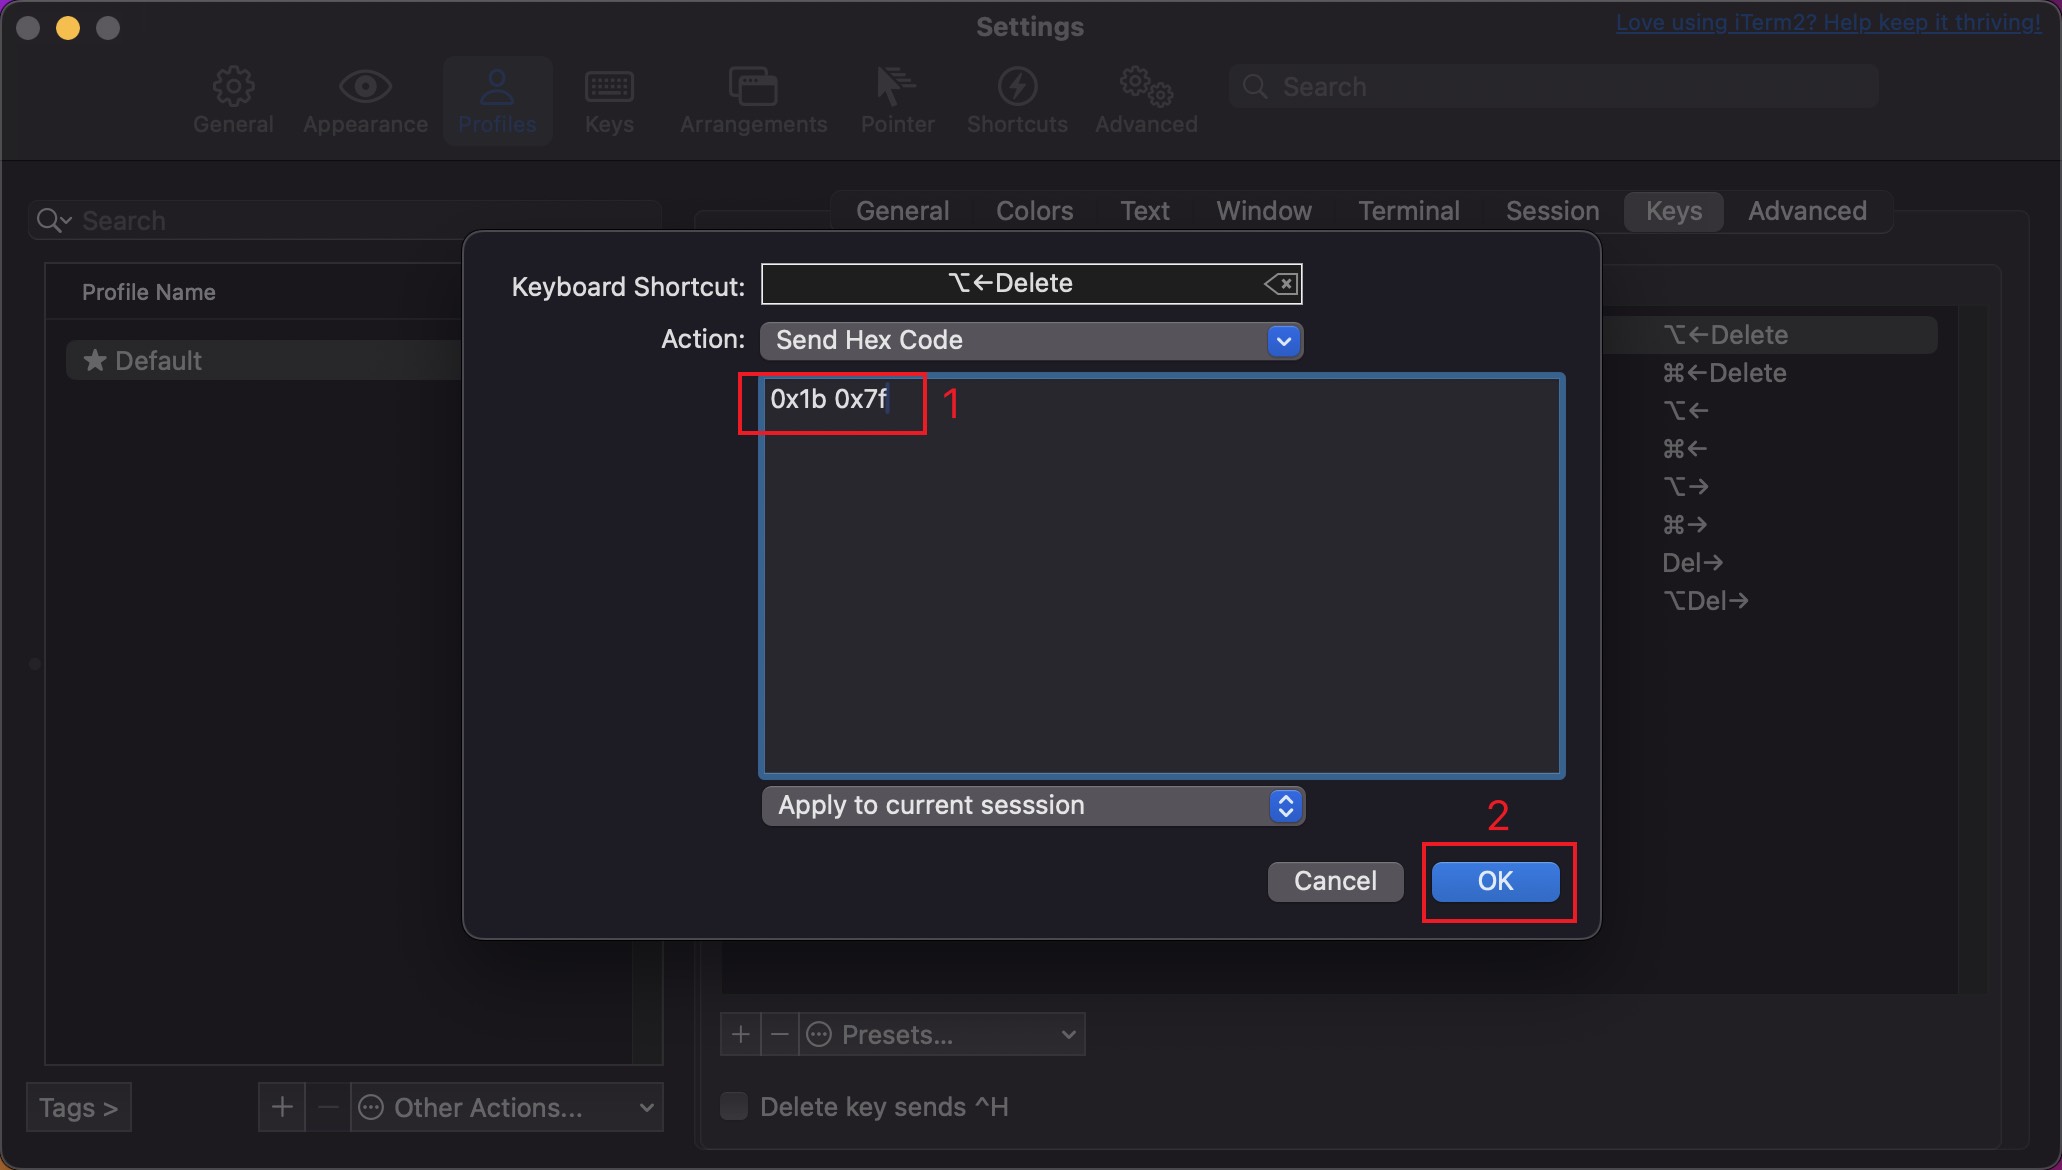
不过,截止到写这篇文章时,iTerm2 自带的 Natural Text Editing 预设存在一个问题,即 ⌥ Option + ⌫ Backspace 无法删除单词。为了解决这个问题,我们需要双击编辑 ⌥←Delete 的键位映射,去掉 Hex Code 中的双引号,如下图所示。
这里的键位映射有一部分是 Zsh 原生支持的,另一部分则需要和 ~/.zshrc 配置文件中的 bindkey 命令配合使用。后面会介绍如何配置。
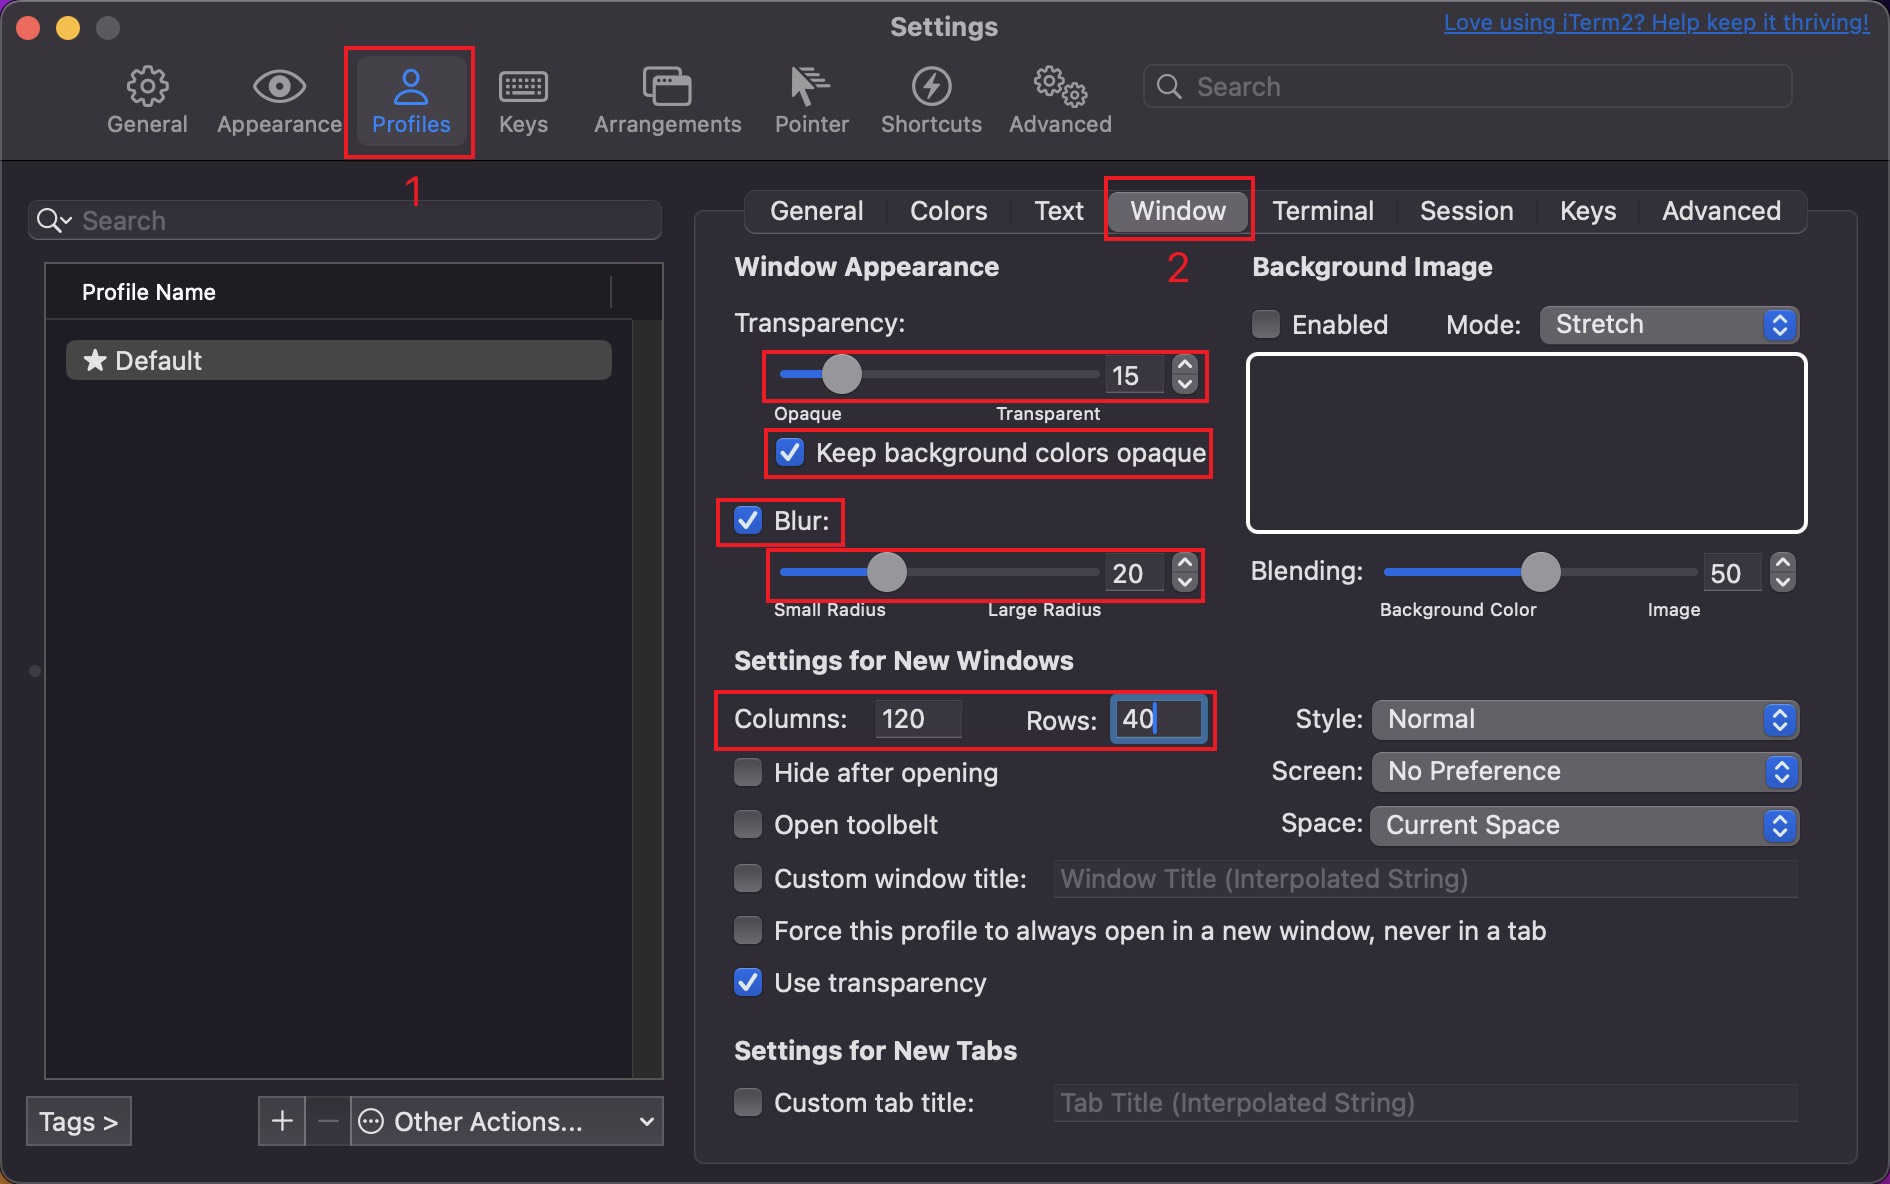
再接着,进入 Profiles -> Window 选项卡,修改下图中标注的几个设置。注意,如果你不喜欢半透明的效果,只需要设置 Columns 和 Rows 即可。
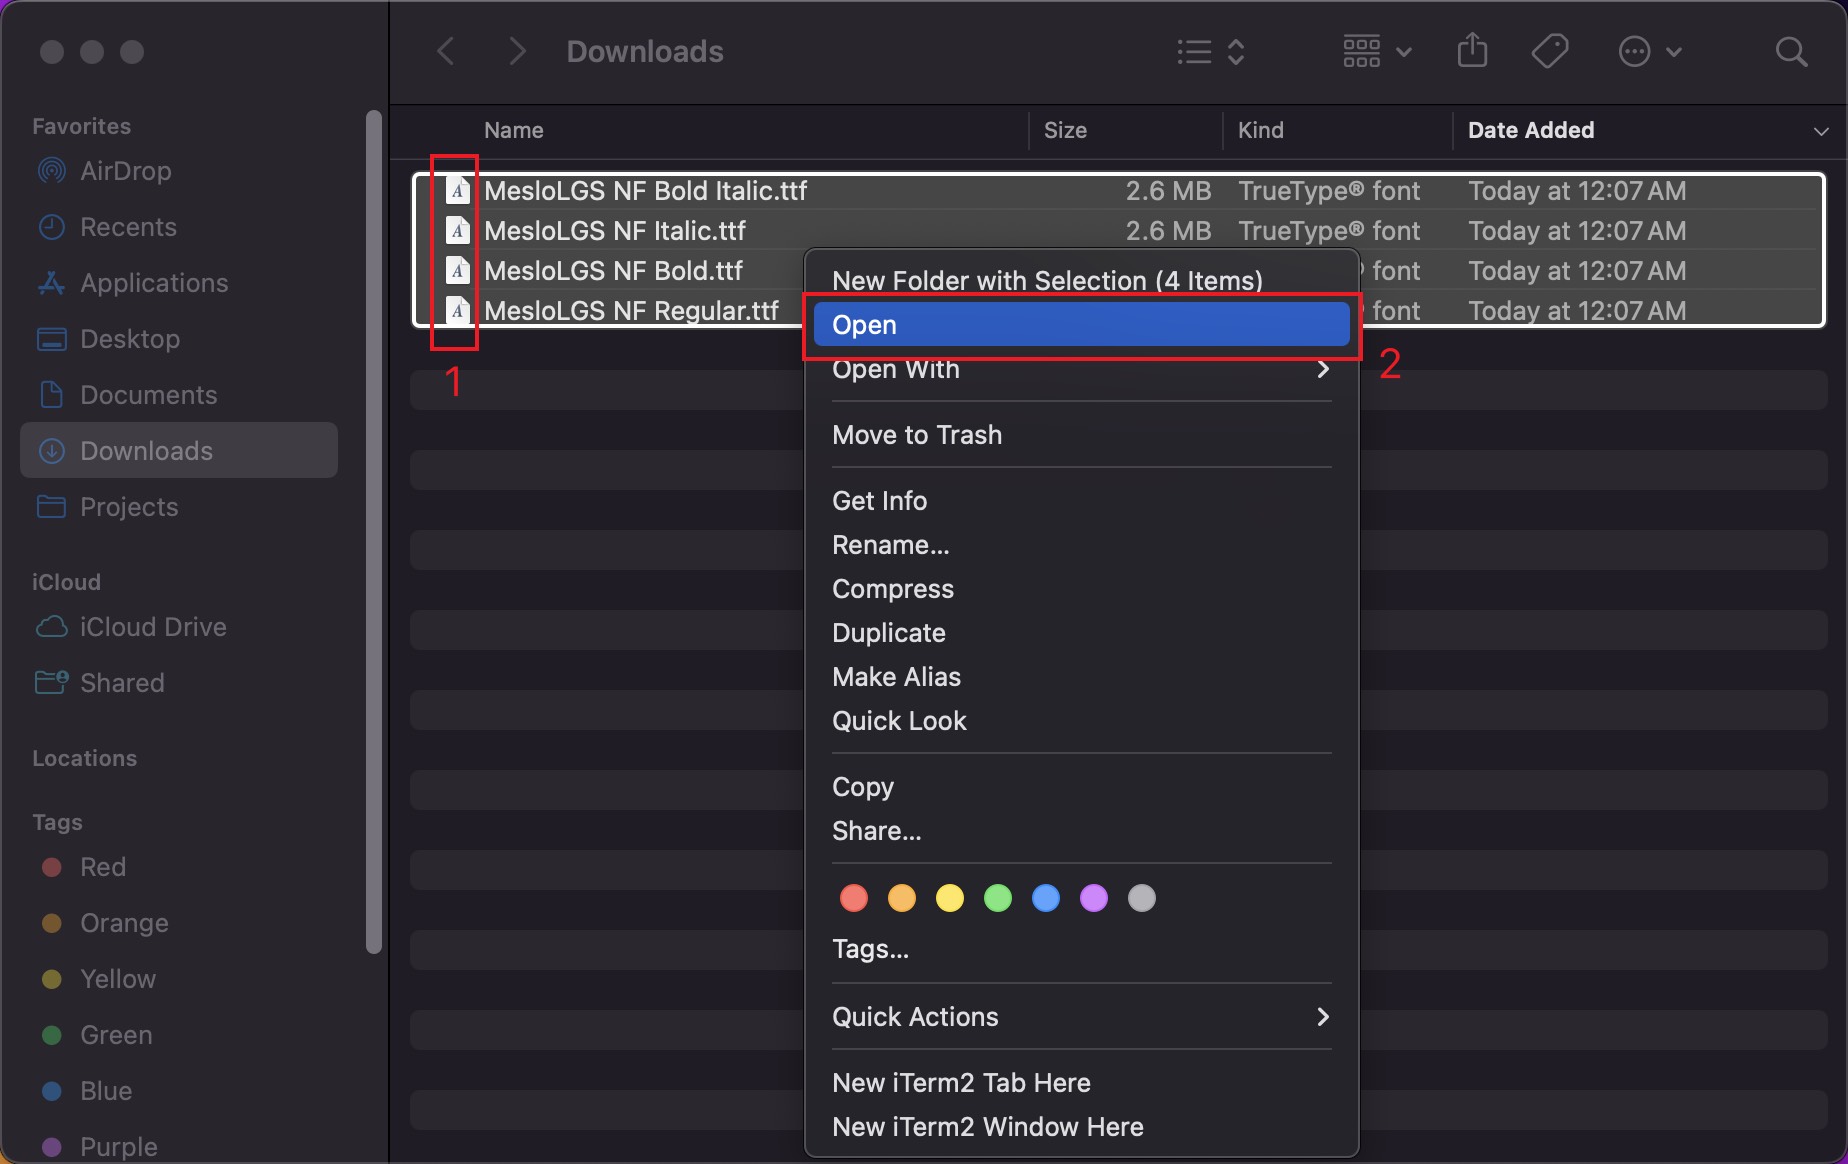
在进行下一步之前,我们需要安装 Meslo Nerd Font 字体。下载以下字体文件:
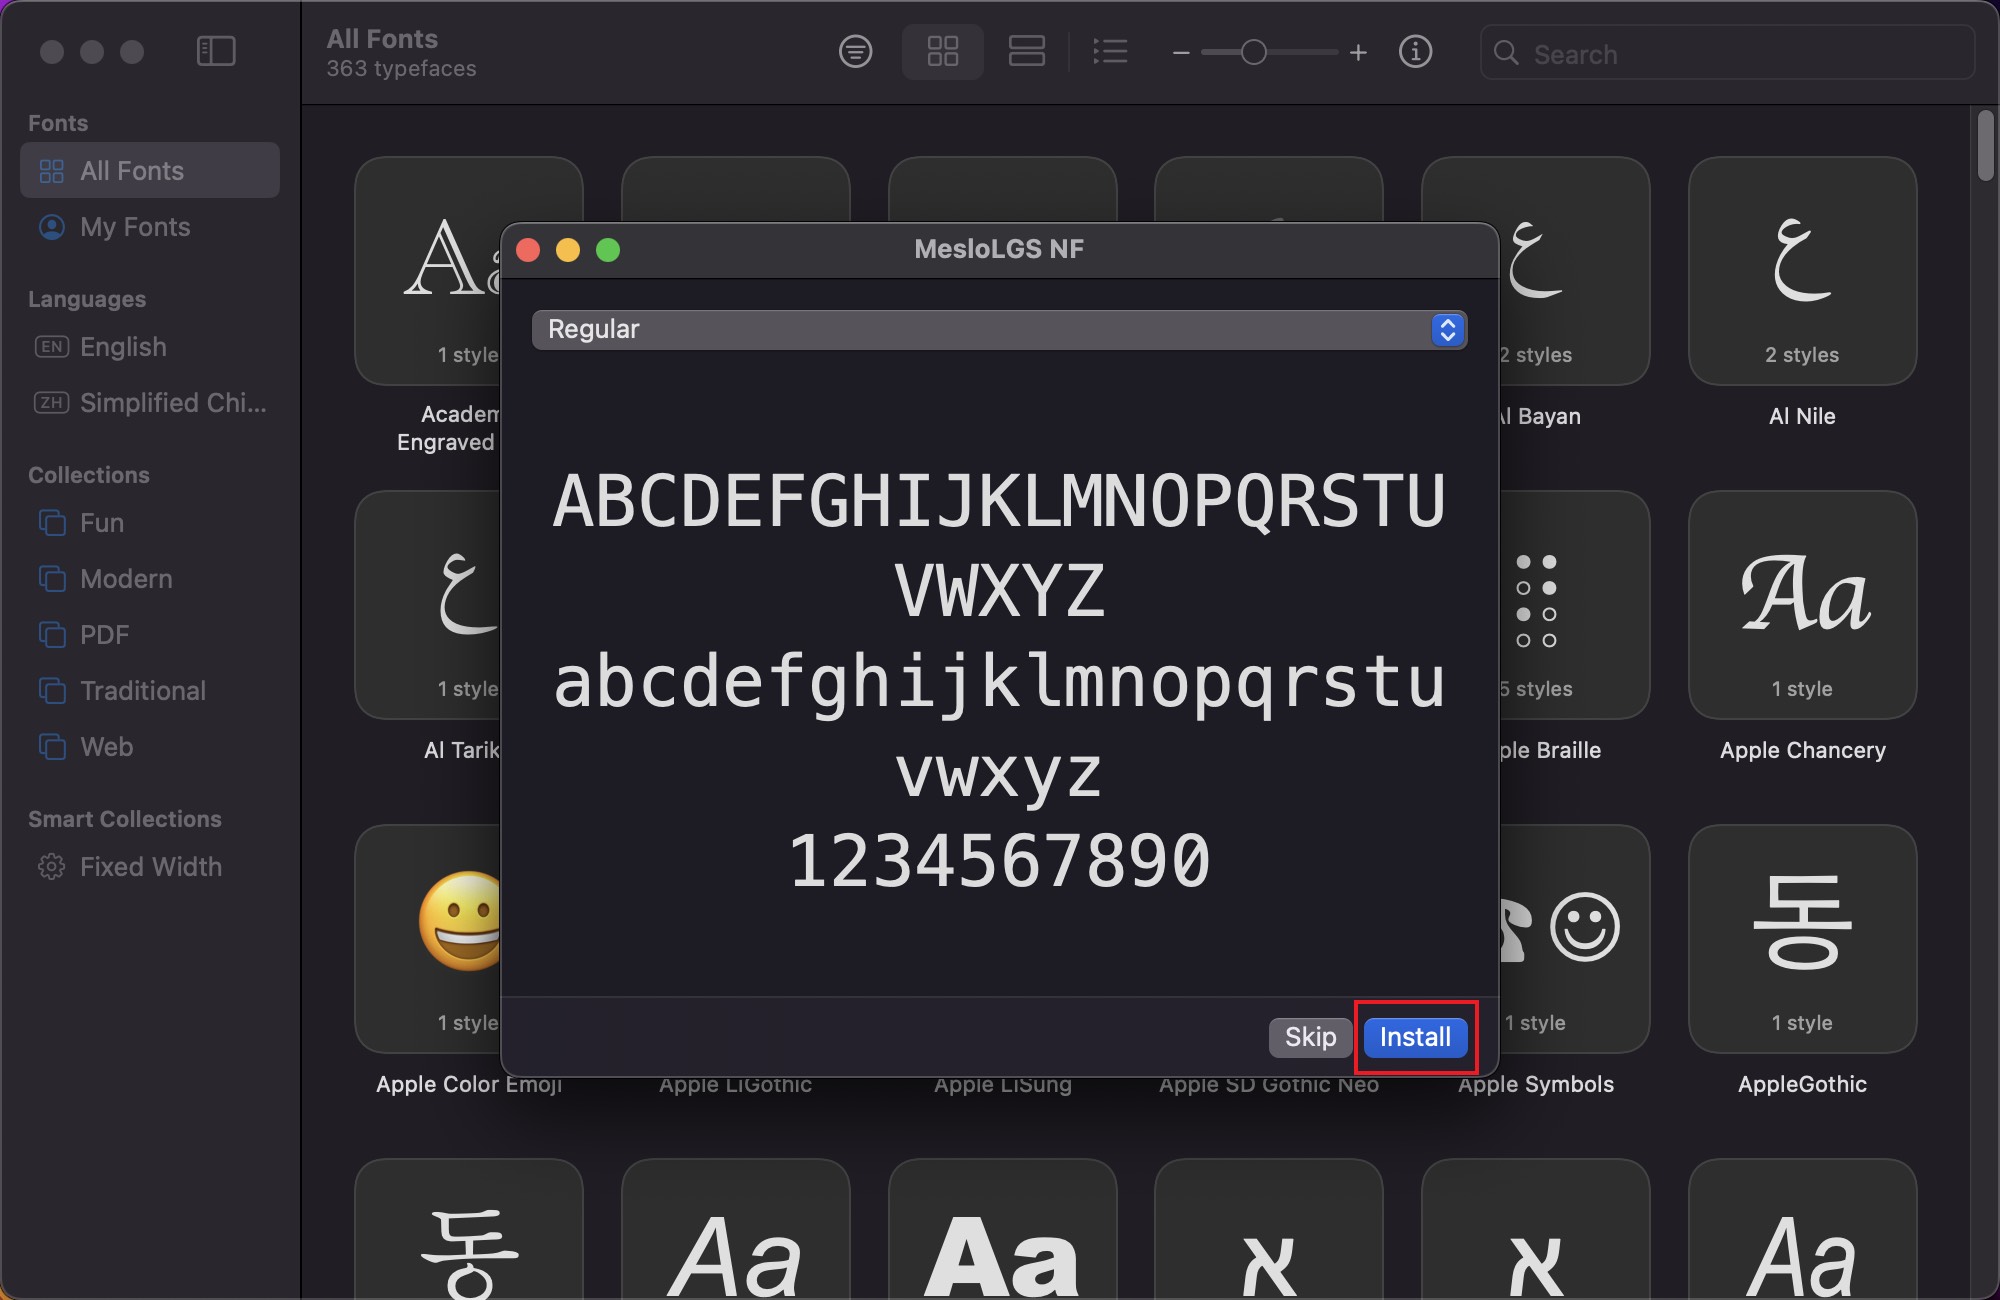
进入下载文件夹,选中所有字体文件,右键,选择“打开”,然后点击“安装”即可。
现在可以回到 iTerm2 的设置页面,进入 Profiles -> Text 选项卡,修改下图中标注的几个设置。
后面会安装的 Powerlevel10k 主题需要这些字体才能正常显示。
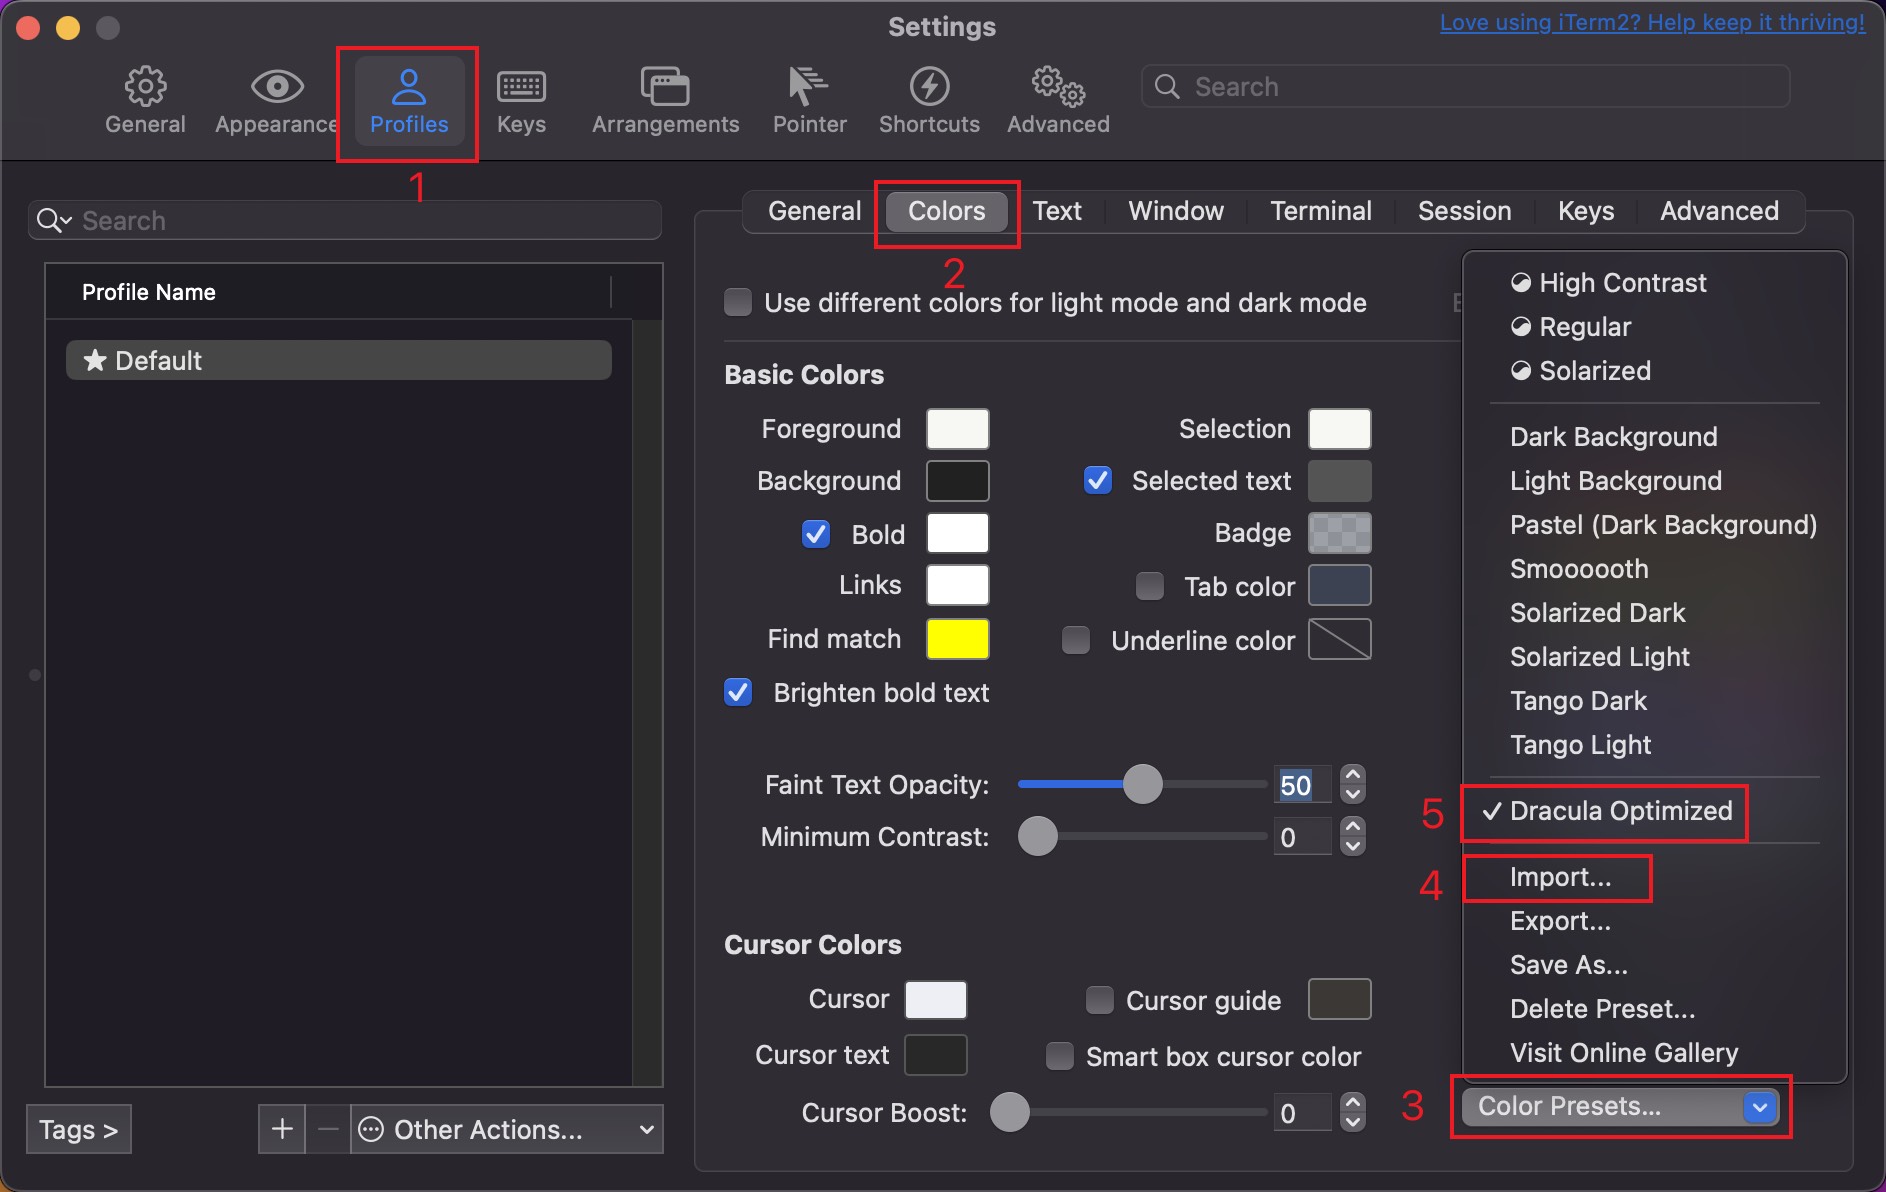
在进行最后一步之前,我们需要准备一个配色方案。你可以前往 https://iterm2colorschemes.com/ 下载自己喜欢的配色方案,也可以使用我的配色方案 (在浏览器中右键链接,选择“另存为”)。
现在可以回到 iTerm2 的设置页面,进入 Profiles -> Colors 选项卡,点击 Color Presets... -> Import...,选择刚刚下载的配色方案,然后再次点击 Color Presets...,选择刚刚导入的配色方案。
改造 Vim
俗话说,工欲善其事,必先利其器。在后面的步骤中,我们会大量地使用 Vim 编辑器来修改各种配置文件,所以,我们先要对 Vim 进行一些改造工作。我们会用到以下几个工具:
首先,我们需要在终端中运行以下命令来下载 Vundle:
1 git clone https://github.com/VundleVim/Vundle.vim.git ~/.vim/bundle/Vundle.vim
接着,我们需要创建 ~/.vimrc 文件,输入以下内容来启用 Vundle 并让它安装各种插件:
1
2
3
4
5
6
7
8
9
10
11
12
13
14
15
16
17
18
19
20
21
22
23
24
25
26
27
28
29
30
31
32
33
34
35
36
37
set nocompatible filetype off set rtp+=~/.vim /bundle/Vundle.vim call vundle#begin()'VundleVim/Vundle.vim' 'morhetz/gruvbox' 'vim-airline/vim-airline' 'vim-airline/vim-airline-themes' call vundle#end() filetype plugin indent on syntax on colorscheme gruvboxlet g:airline_theme ='simple' let g:airline_powerline_fonts =1 let g:airline #extensions#tabline#enabled=1
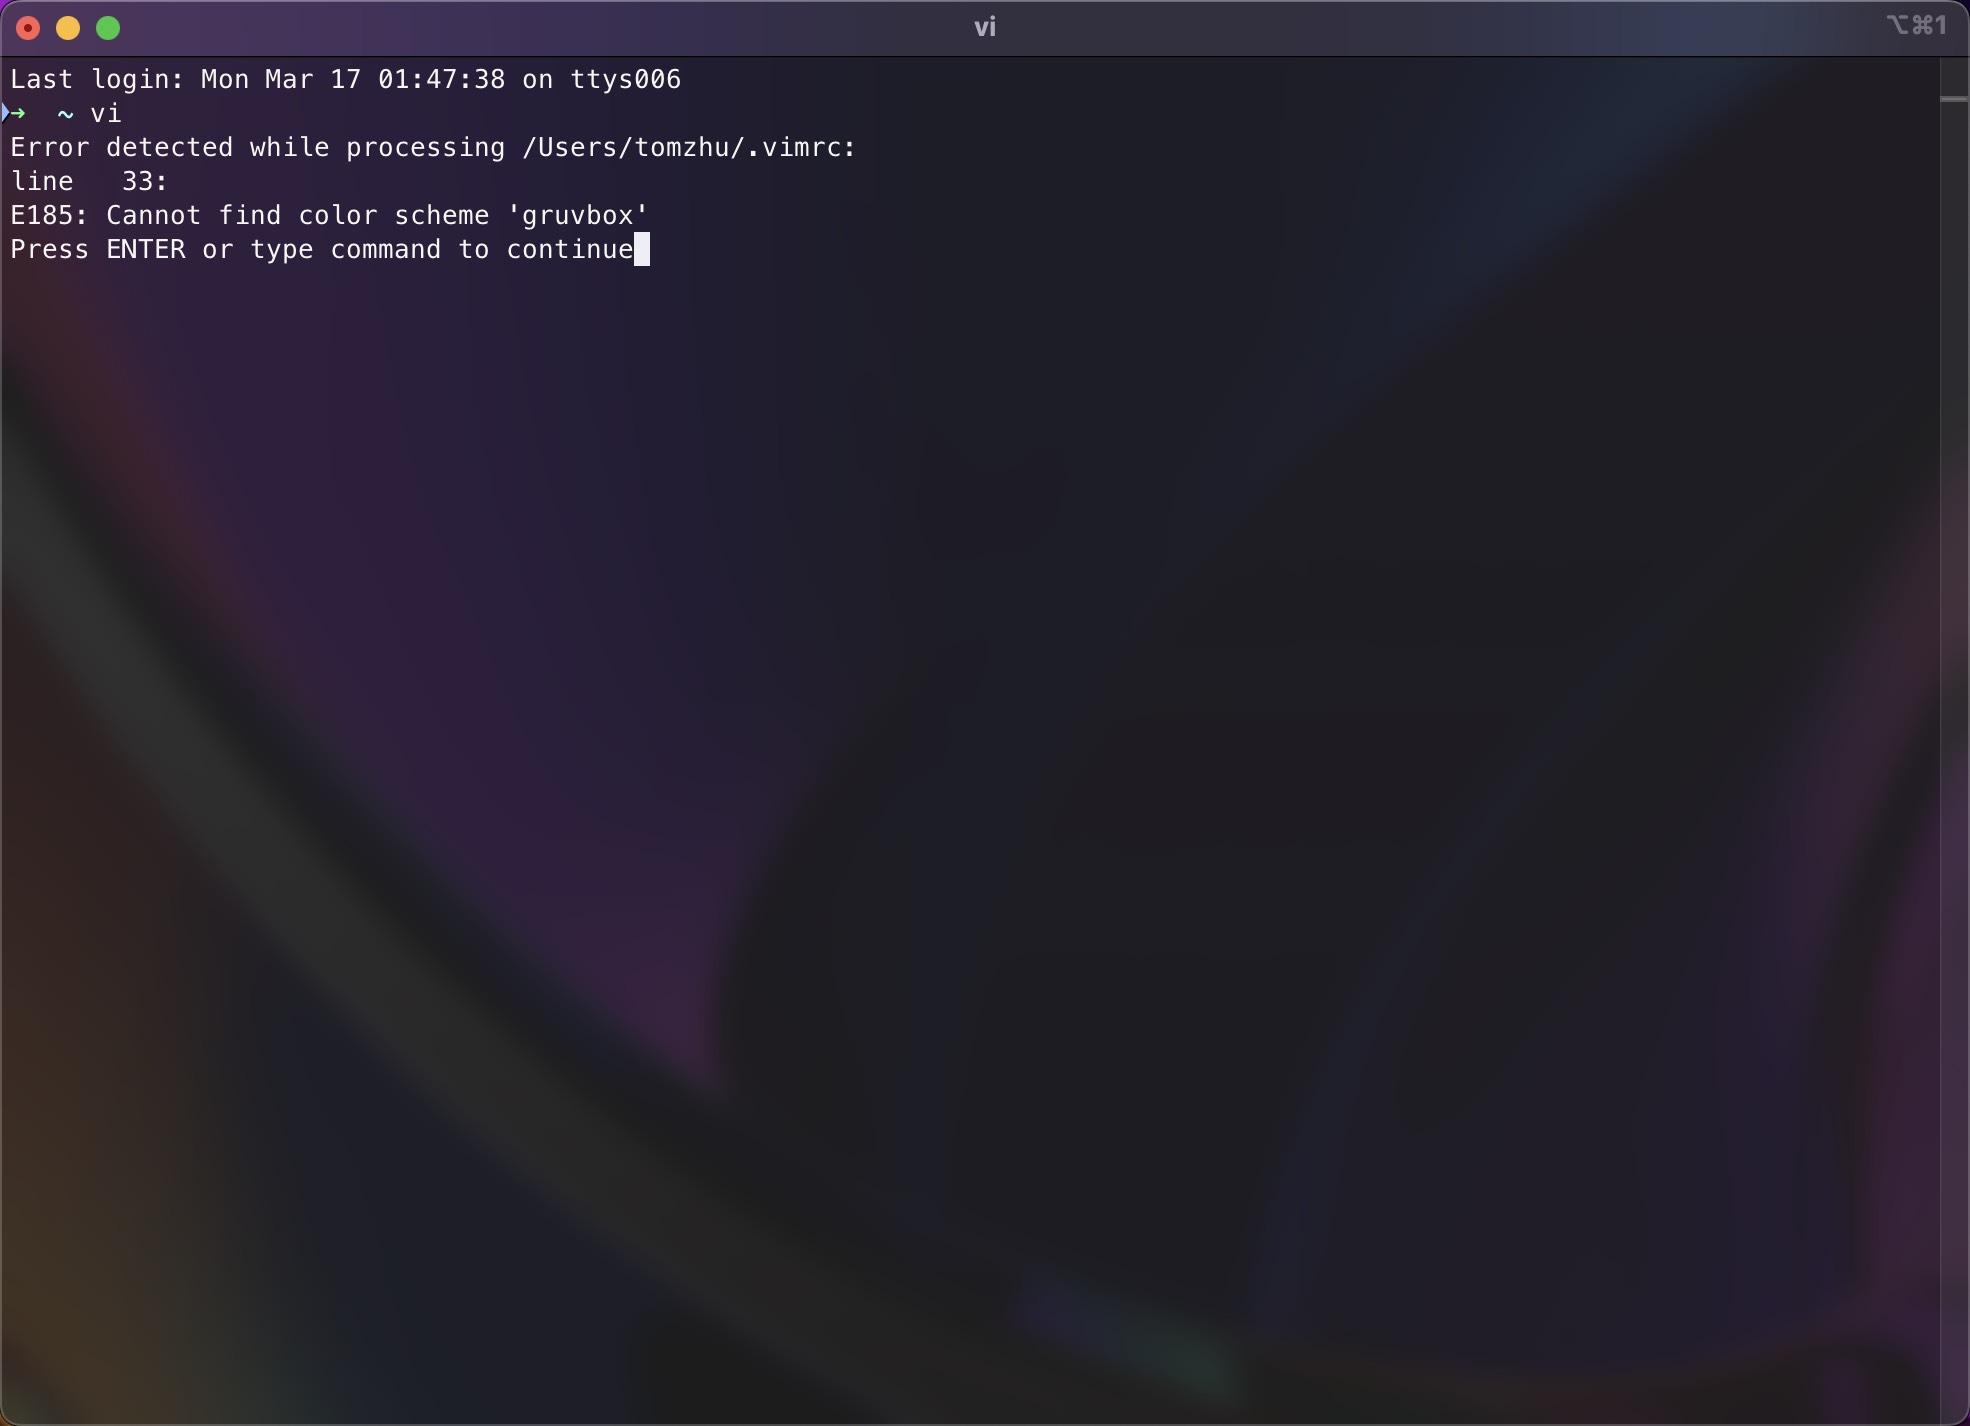
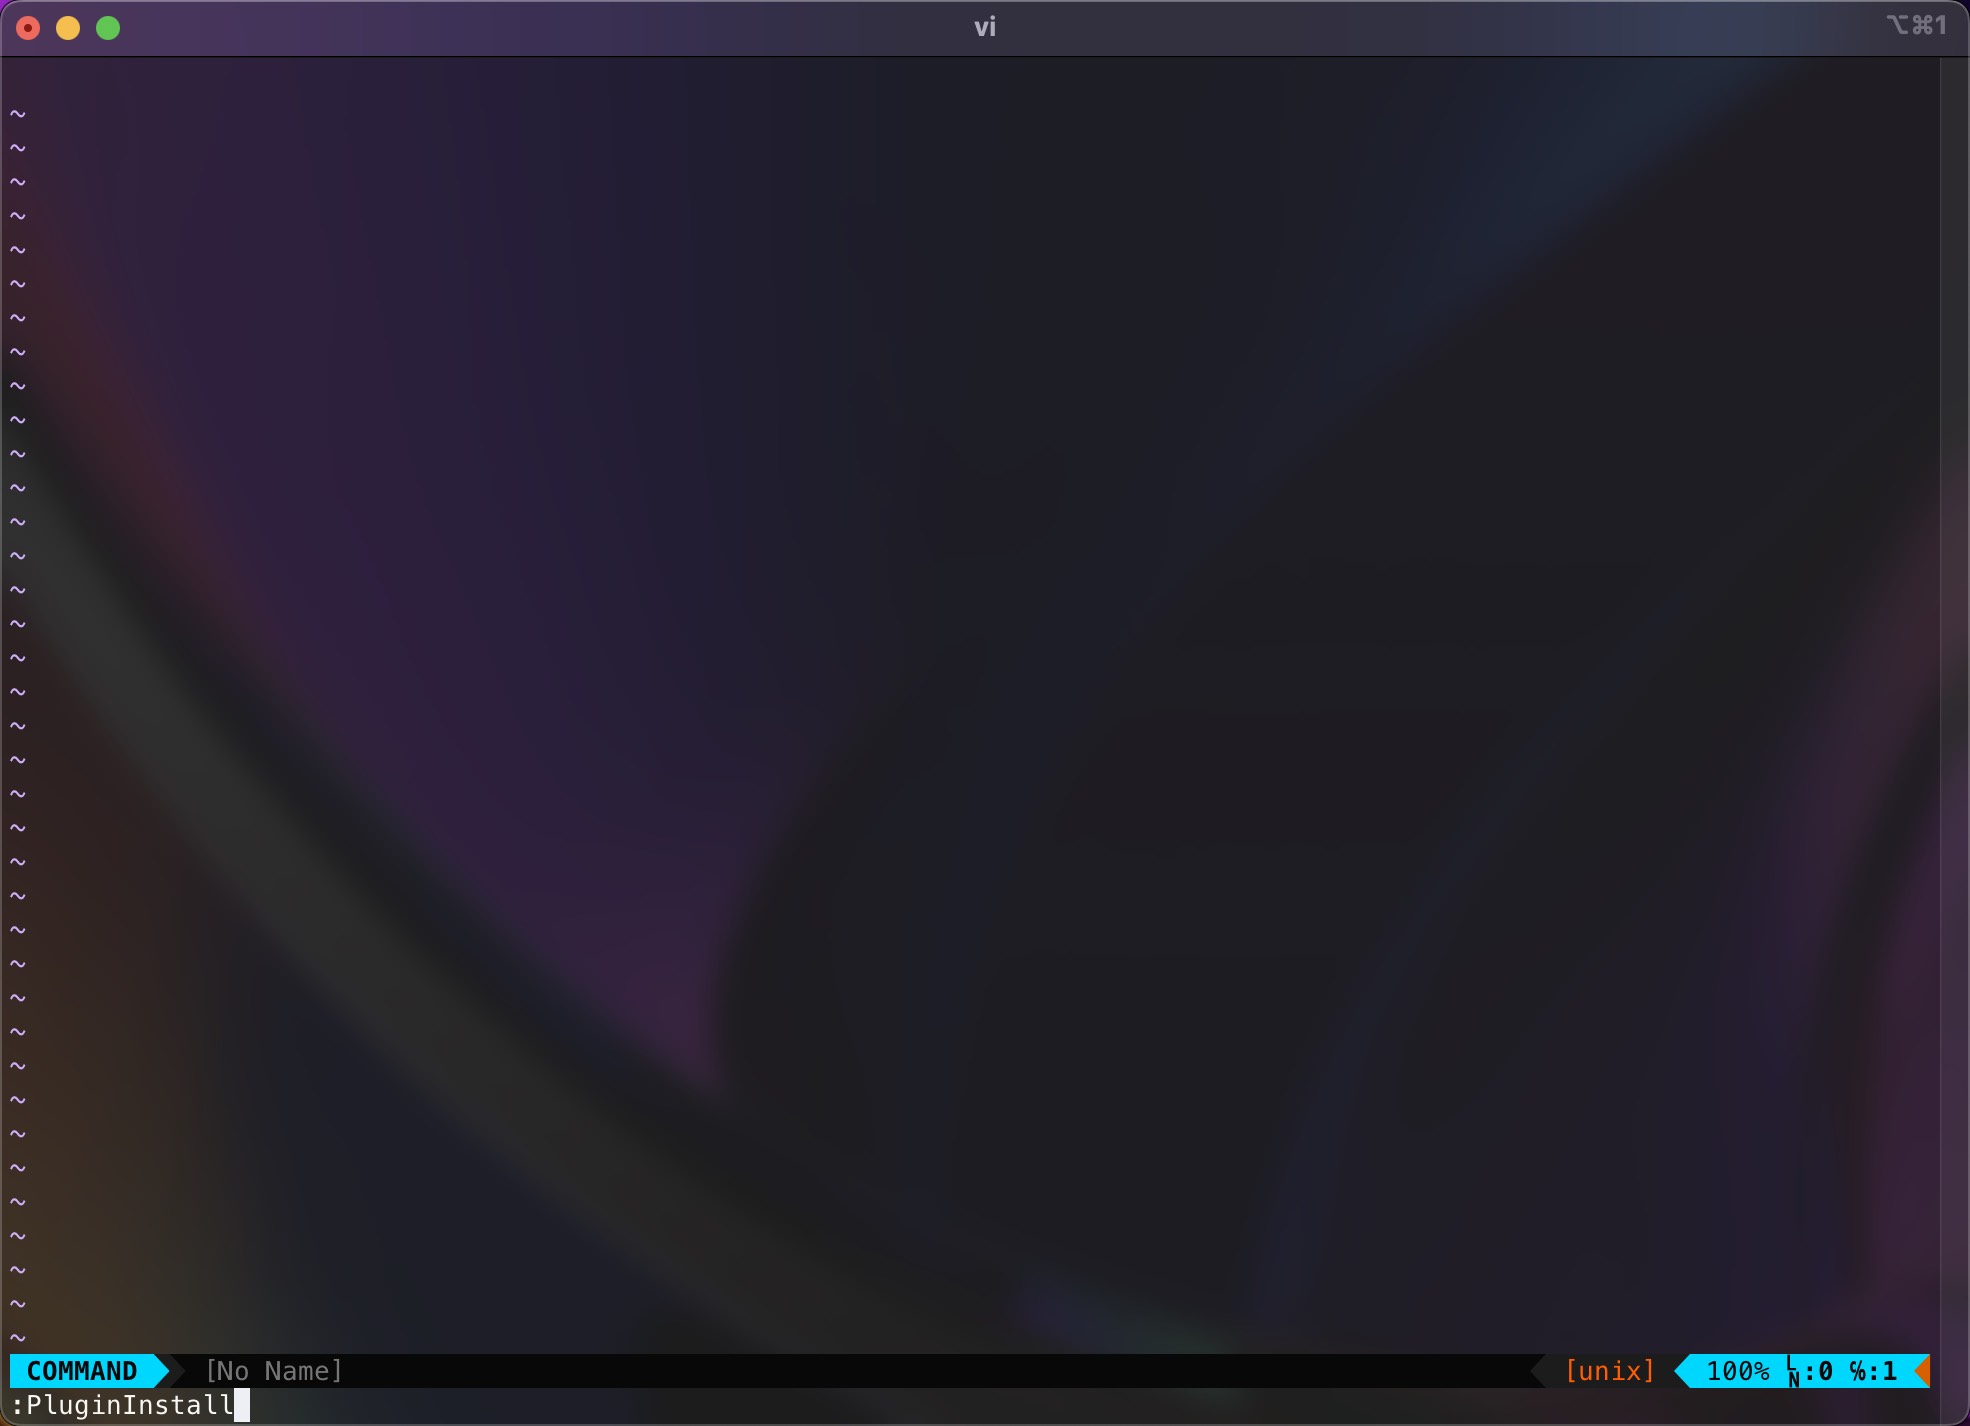
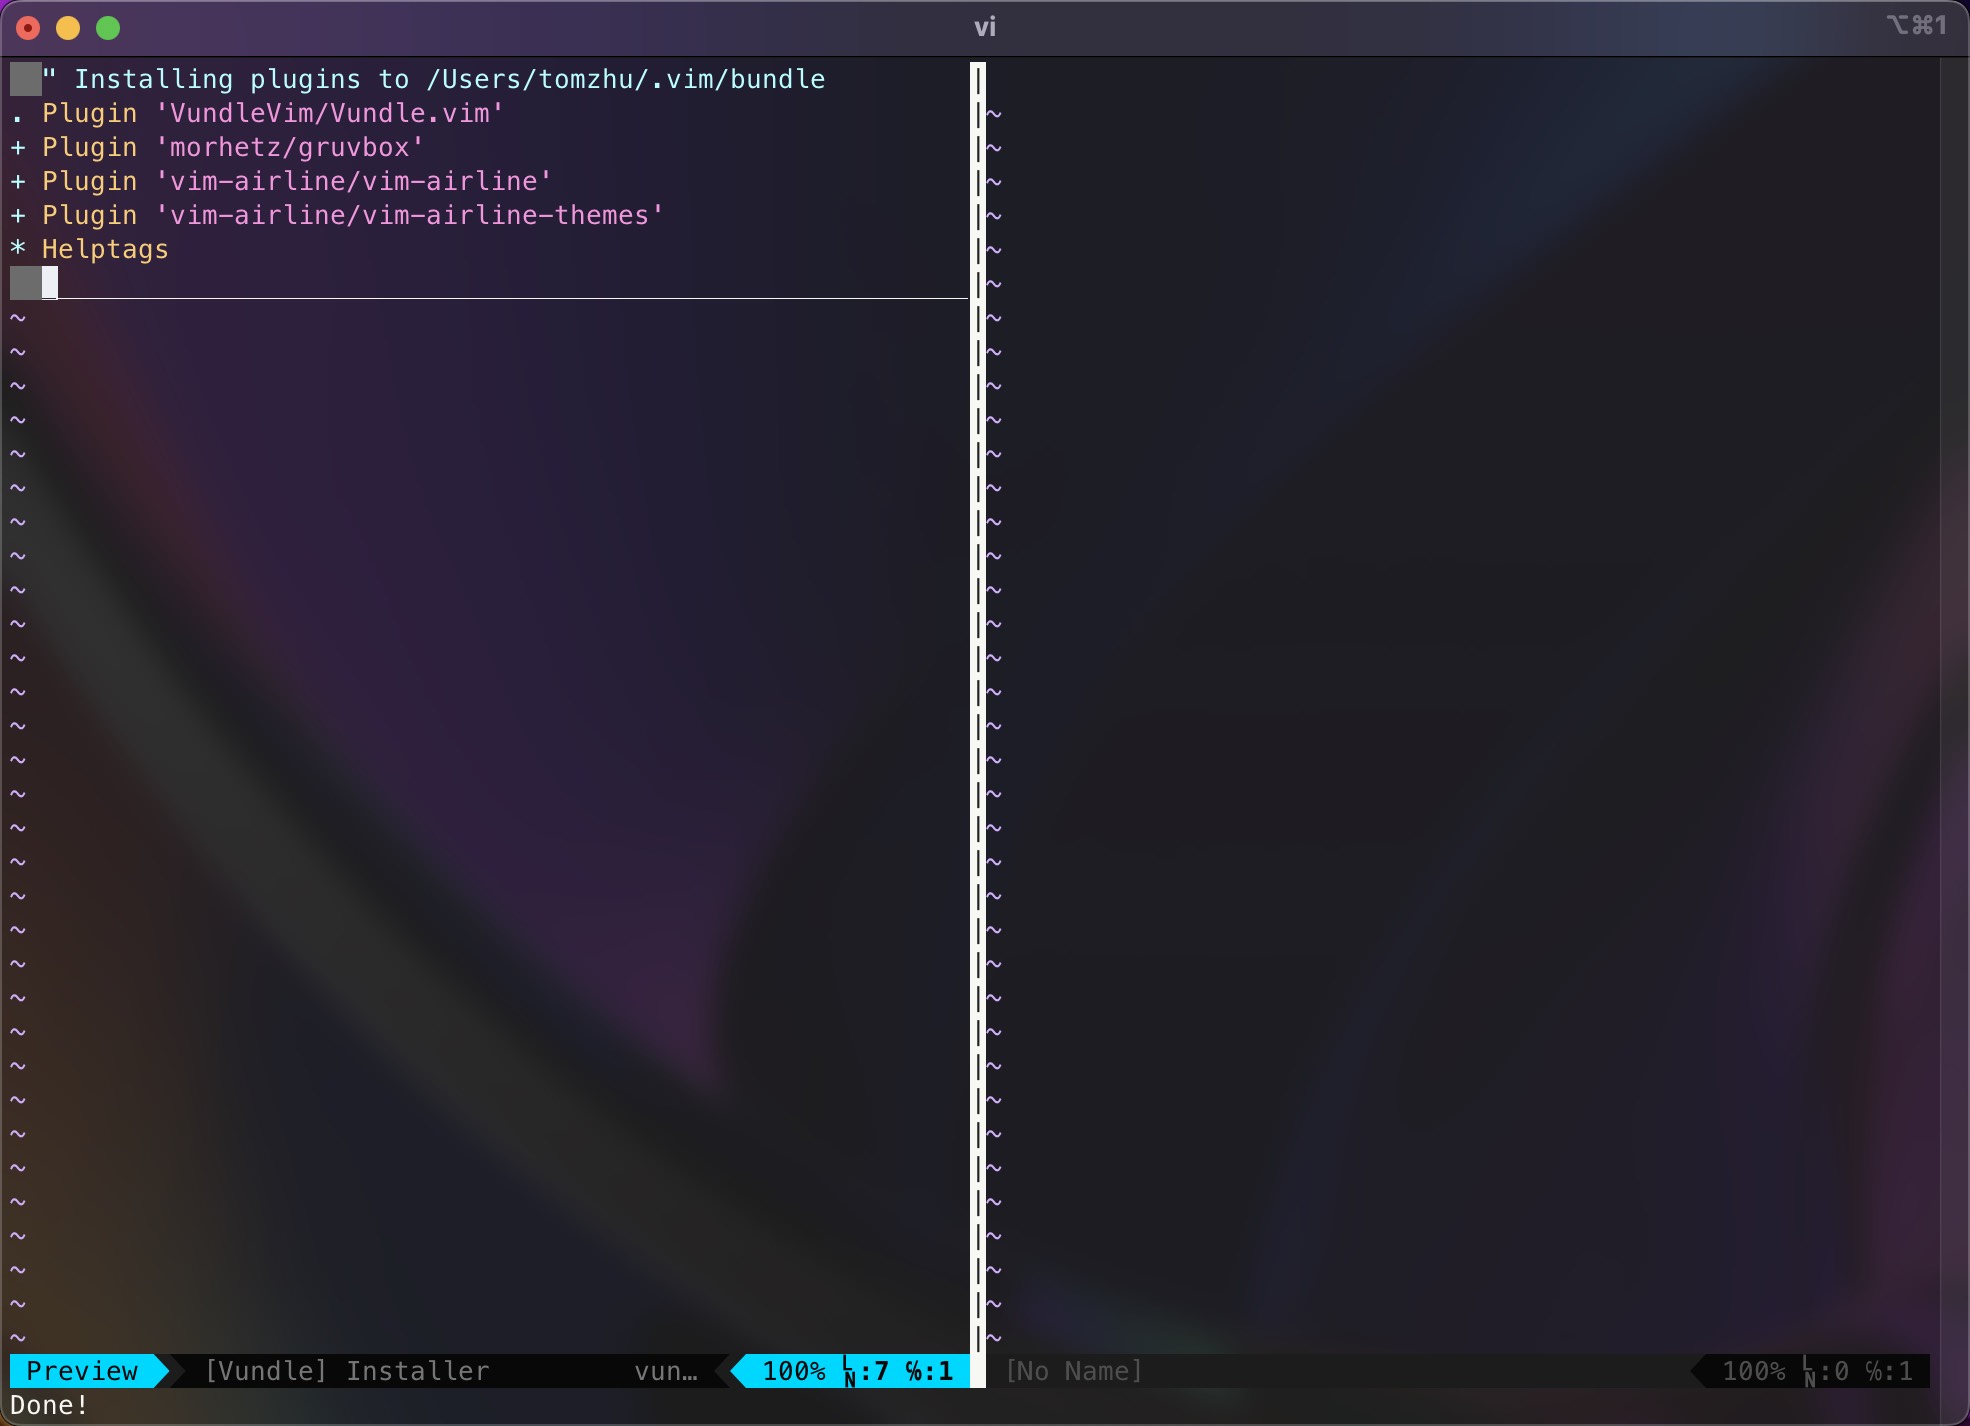
最后,让我们打开 Vim,这里会报错,因为我们的配色方案还没有作为插件被安装。我们直接按 Enter 键进入 Vim,然后运行 :PluginInstall 命令来安装插件。退出 Vim 后再次打开,就可以正常使用了。
改造 Zsh Oh My Zsh 是一个广受欢迎的 Zsh 配置管理工具。我们需要在终端中运行以下命令来安装它:
1 sh -c "$(curl -fsSL https://raw.githubusercontent.com/ohmyzsh/ohmyzsh/master/tools/install.sh)"
Oh My Zsh 支持众多的插件和主题。我个人比较喜欢的插件有:
我们需要在终端中运行以下命令来下载它们:
1
2
3
4
git clone https://github.com/TamCore/autoupdate-oh-my-zsh-plugins ${ZSH_CUSTOM:-~/.oh-my-zsh/custom}/plugins/autoupdate
至于主题,我比较喜欢 Powerlevel10k 。我们需要在终端中运行以下命令来下载它:
1 git clone https://github.com/romkatv/powerlevel10k.git ${ZSH_CUSTOM:-$HOME/.oh-my-zsh/custom}/themes/powerlevel10k
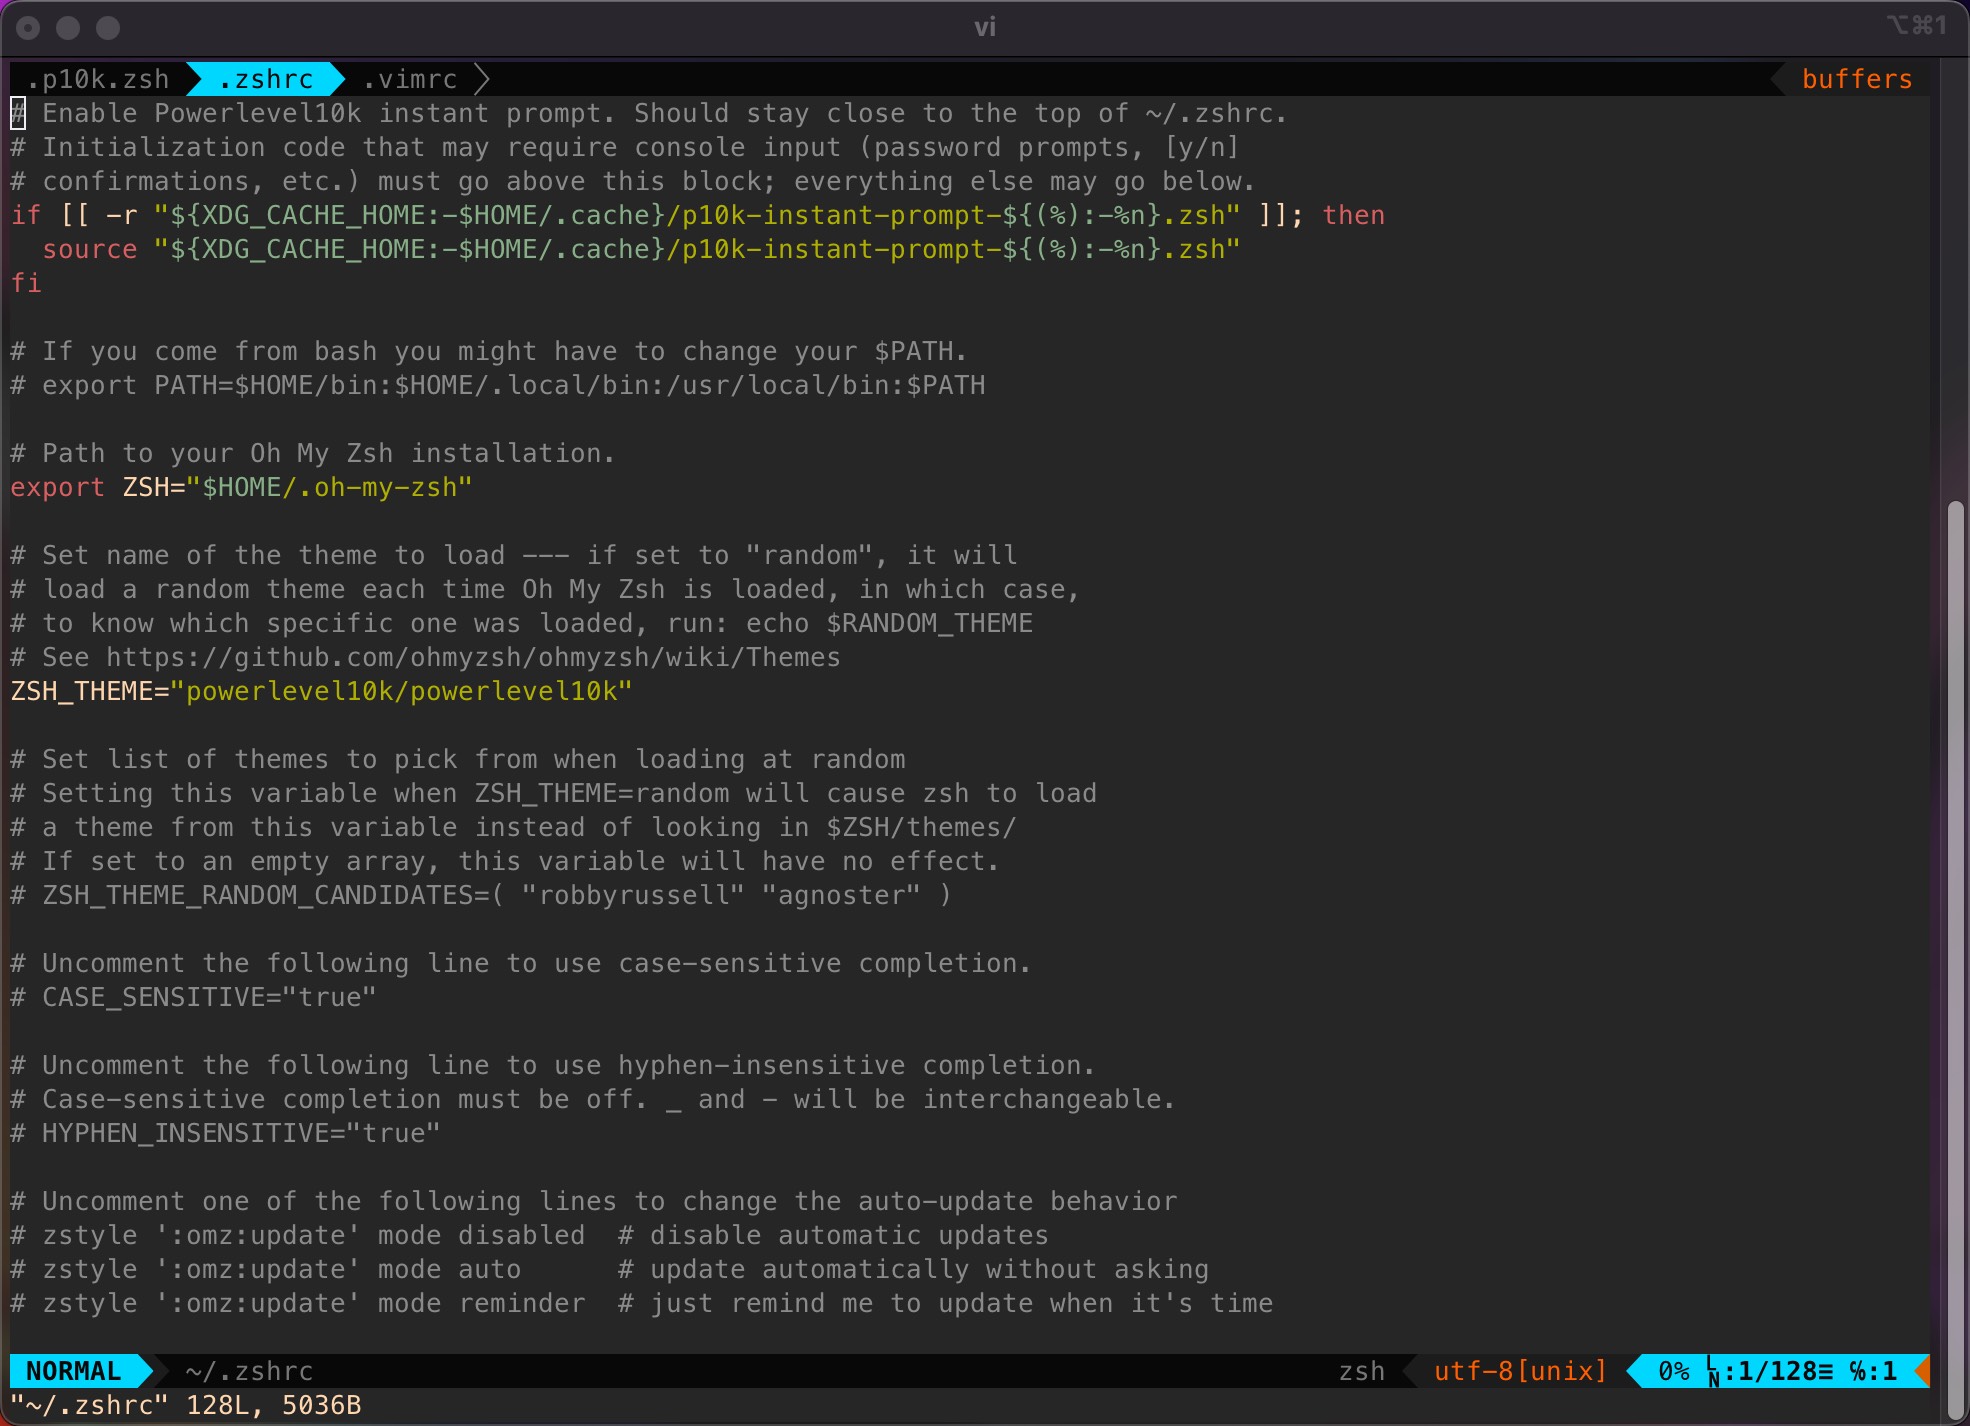
接着,我们需要编辑 ~/.zshrc 文件来启用 Powerlevel10k:
1
2
3
4
5
6
@@ -8,7 +8,7 @@ export ZSH="$HOME/.oh-my-zsh"-ZSH_THEME="robbyrussell" +ZSH_THEME="powerlevel10k/powerlevel10k"
退出当前 iTerm2 窗口或标签页后再次打开,将会自动进入 Powerlevel10k 的配置流程。
你可以根据自己的喜好选择不同的样式,也可以参考我的配置。
1
2
3
4
5
6
7
8
9
10
11
12
13
14
15
16
17
18
19
20
21
22
23
24
25
26
27
28
29
30
31
32
33
34
35
36
37
38
39
40
41
42
43
44
45
46
47
48
49
50
51
52
53
54
55
56
57
58
59
60
61
62
Does this look like a diamond (rotated square)?
配置流程结束后,Powerlevel10k 会自动更新 ~/.zshrc 文件。我们需要再次编辑 ~/.zshrc 文件来启用各种插件:
1
2
3
4
5
6
7
8
9
10
11
12
13
14
15
16
17
18
19
20
21
22
23
24
25
26
27
28
29
30
31
32
33
34
35
36
37
38
39
@@ -67,7 +67,7 @@ ZSH_THEME="powerlevel10k/powerlevel10k"-# HIST_STAMPS="mm/dd/yyyy" +HIST_STAMPS="yyyy-mm-dd" @@ -77,7 +77,7 @@ ZSH_THEME="powerlevel10k/powerlevel10k"-plugins=(git) +plugins=(git vi-mode z autoupdate fast-syntax-highlighting zsh-autosuggestions zsh-history-substring-search) @@ -109,6 +109,20 @@ source $ZSH/oh-my-zsh.sh+alias zshconfig="vi ~/.zshrc" +alias p10kconfig="vi ~/.p10k.zsh" +alias sshconfig="vi ~/.ssh/config" +alias sshhosts="vi ~/.ssh/known_hosts" + +# Key bindings +bindkey '^P' history-substring-search-up +bindkey '^N' history-substring-search-down + +# Require the Natural Text Editing preset in iTerm2 +bindkey '^U' kill-whole-line +bindkey '^[b' backward-word +bindkey '^[f' forward-word +bindkey '^\x1b\x7f' backward-kill-word
这里我设置了我常用的一些 alias,以及配合 iTerm2 的键位映射和 zsh-history-substring-search 插件的 bindkey。你可以根据自己的需求进行修改,但请保留这些 bindkey。
最后,我们需要编辑 ~/.p10k.zsh 文件来微调一下 Powerlevel10k 的颜色:
1
2
3
4
5
6
7
8
9
10
11
12
13
14
15
16
17
18
19
20
21
22
23
24
25
26
27
28
29
30
@@ -96,7 +96,7 @@ - # vi_mode # vi mode (you don't need this if you've enabled prompt_char) + vi_mode # vi mode (you don't need this if you've enabled prompt_char) @@ -841,16 +841,16 @@ - typeset -g POWERLEVEL9K_VI_MODE_NORMAL_BACKGROUND=2 + typeset -g POWERLEVEL9K_VI_MODE_NORMAL_BACKGROUND=4 - typeset -g POWERLEVEL9K_VI_MODE_VISUAL_BACKGROUND=4 + typeset -g POWERLEVEL9K_VI_MODE_VISUAL_BACKGROUND=3 - typeset -g POWERLEVEL9K_VI_MODE_OVERWRITE_BACKGROUND=3 + typeset -g POWERLEVEL9K_VI_MODE_OVERWRITE_BACKGROUND=9 - typeset -g POWERLEVEL9K_VI_INSERT_MODE_STRING= - typeset -g POWERLEVEL9K_VI_MODE_INSERT_FOREGROUND=8 + typeset -g POWERLEVEL9K_VI_INSERT_MODE_STRING=INSERT + typeset -g POWERLEVEL9K_VI_MODE_INSERT_BACKGROUND=2
这里主要修改了 vi-mode 的状态栏颜色,让它更加醒目。你也可以根据自己的喜好进行修改。
最后一行的 FOREGROUND 需要改成 BACKGROUND,请仔细检查。
常见问题 如果你同时也有使用 IDE 中的终端,可能会遇到字体问题。这里以 Visual Studio Code 为例,我们需要按 ⌘ Command + , 打开设置,搜索 terminal.integrated.fontFamily,然后将其设置为 MesloLGS NF。
常见用法分享 这里分享一些常用的功能和快捷键。
⌃ Control + A / ⌘ Command + ← 移动到行首⌃ Control + E / ⌘ Command + → 移动到行尾⌥ Option + ← 向左移动一个单词⌥ Option + → 向右移动一个单词⌃ Control + U / ⌘ Command + ⌫ Backspace 删除整行⌃ Control + W / ⌥ Option + ⌫ Backspace 删除一个单词⌃ Control + L 清屏
zsh-autosuggestions 插件会在输入时,实时地在历史记录中搜索,并显示灰色的提示,你可以使用 → / ⌃ Control + E / ⌘ Command + → 键来接受建议,也可以使用 ⌥ Option + → 来接受一个单词。
zsh-history-substring-search 插件可以允许你在历史记录中搜索。你只需要先输入一部分命令,然后使用 ⌃ Control + P / ⌃ Control + N 来搜索上一个或下一个匹配。
git 插件会简化 Git 命令,比如:
1
2
3
4
5
6
7
8
9
10
11
12
13
14
15
gst # git status
z 插件则会记录你经常访问的目录,你可以使用 z [目录路径关键字] 来快速跳转到目标目录,节约了用 cd 命令输入完整路径的时间。
autoupdate-zsh-plugin 插件会自动更新插件和主题,你也可以使用 upgrade_oh_my_zsh_custom 命令来手动更新。